Deep-dive into the deployment of an on-premise low-privileged LLM server
In 1826, children fantasized riding horses in the Wild West. In 1926, it was outrunning the law as a moonshiner. In 2026, managing distributed inference servers without leaking all the company data is surely a universal dream among the new generation. This article rewinds our journey deploying an on-premise LLM server, with a critical eye on the underlying stack security.
Looking to improve your skills? Discover our trainings sessions! Learn more.
Introduction
It's no secret that LLMs are for most of us standard tools in the toolbox.
Many organizations would like to leverage their processing capabilities, while preserving a strict level of confidentiality for their business data
Driven by world-hype and curiosity, we decided to give it a first shot.
Why on-premise LLM?
If you run a privacy-conscious business, using a cloud-based LLM is likely not an option. In order to be extra-sure your trade secrets remain secrets, you would better run it at home.
On-premise LLM gives us full accountability on data protection mesures, auditability, and offers the great convenience of working with actual company data without third‑party dependency regarding client trust and high-stake proprietary research material.

Goals and non-goals
Since day one, the overall infrastructure was designed with scaling and isolation concerns in mind. Multiple teams are willing to invest into GPUs, even expensive ones, as confidential LLMs would be a huge time saving opportunity for them. Document translation, proofreading, log crawling, tooling improvement, offline knowledge index, codebase context analysis, are some of many use-cases candidates.
The primary goal of this project is to provide fully air-gapped LLM instances that eliminates network data exfiltration risks. In-depth process isolation design remains the main concern, yet being in a controlled network environment gives us a bit more flexibility regarding assessed deployment convenience trade-offs.
Rome was not built in a day, neither was Claude Code.
This first version is meant to be completely stateless: no input data, no custom training, no RAG pipeline, no agent, no connector. Tighter scope means faster production, fast production means happy developers.
For the sake of simplicity, this article will use internet-pulled resources.
In a real production context, internal registry is the way to go.
Some important notions
If you are familiar with basic LLM concepts and vocabulary, you can jump to next section.
Most of the following concepts are fundamental to understand in-depth LLM text processing, though we don't need an extensive understanding of the topic so a simple abstract will do it for now.
Tokens
LLM models process lexical corpus by chunks (roughly words or partial words) called "tokens".
Converting input text into tokens is one of the first steps in the inference pipeline, called "tokenization".
OpenAI provides "tokenizer", an online tool to visualize GPT text tokenization.
Model files
To keep things simple, a model is a large file, mostly composed by floating point numbers generated during the "training phase". This model is then used to statistically guess a next token based on all previous tokens. This process is called "inference". These numbers (weights) are stored with a n-bits precision quantization.
Context window
The total number of tokens the model can attend to during inference.
This number differs for each model.
For example, Mistral-Small-24B-Instruct-2501 has a maximum context length of 32,768 tokens (roughly 32k).
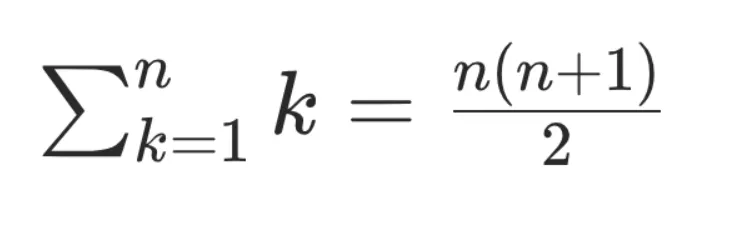
KV cache
In order to produce high quality inference, each token must be computed based on all previously generated tokens.
To illustrate, suppose the input token sequence: "Tommy is a great". Guessing the next token only based on input token "great" is a hopeless mission, as it has an obvious causal relationship with "Tommy" (subject, probably human male), "is" (verb, descriptive) and "a" (indefinite article, belonging).
Context matters, that means without memory persistence every previous tokens would have to be (re)computed before generating the next ones. That operation would have a dramatic impact on performances, getting worse as token context size increases.
With a simplified view of underlying math, we can consider that - without caching mechanism - computing a n token sequence has a quadratic complexity 0(n²). Which is not great.
With a vector cache, each token value is only computed once and then moved in a kv store for future inference work.
Complexity becomes linear O(n), which is way better.
Example: inferring "magician" from the previous sequence would only cost n reads from the kv cache:
Tommy  → [0.12, -0.44, 1.03, ...]
is     → [-0.31, 0.88, 0.02, ...]
a      → [0.07, -0.12, 0.55, ...]
great  → [1.21, 0.33, -0.91, ...]
As we can imagine, the math is a bit more complex than that.
But that example emphasizes the importance of this component, and how undersizing it can underperform the final setup.
Multi-head attention standard transformer models (today's standard) KV cache size formula is:

Ok enough theory, now hands-on!
Step 1: Hardware shopping
After empiric testing of several models in real work conditions, gpt-oss-120b turned out to be the best performance-quality compromise for us. At 4-bit quantization, the model files weights roughly 60 GiB (4bits x 120b parameters) + metadata which is quite a massive amount of data to fit in a GPU memory, and will definitely required high-end hardware.
As no company data is provided to the model through vector database (yet), it was important to select a model with a consequent input context size limit - which is 131,072 tokens for
gpt-oss-120b.
We started with some specification criteria:
- Model must fit in the GPU vRAM.
- Context kv-cache would preferably fit in the GPU vRAM, or at least benefit from high performance memory page migration mechanism.
- We have limited on-premise rack space, so the smaller form factor per GPU the better.
- Enforce security boundary at GPU-level: differents teams will not share GPUs, so each must have its own dedicated GPU, and no leaks between them.
Coming-back to theory for a moment.
The GPU is, unsurprisingly, the most important piece of hardware to choose. First criteria to consider is the vRAM size (video RAM), the GPU builtin volatile memory, which gives processing unit extremely fast access to data once it's loaded. Three things are expected inside the memory:
- The model weights
- The context kv cache
- Various compute buffers
Estimated model weights is basically the model file size.
A better estimation would be reading all tensor speficifation, skipping any gguf header metadata:
import math
from gguf import GGUFReader

shards = (
    "gpt-oss-120b-mxfp4-00001-of-00003.gguf",
    "gpt-oss-120b-mxfp4-00002-of-00003.gguf",
    "gpt-oss-120b-mxfp4-00003-of-00003.gguf",
)

n_parameters = 0
n_bytes = 0

for path in shards:
    reader = GGUFReader(path)
    for tensor in reader.tensors:
        n_parameters += math.prod(tensor.shape)
        n_bytes += tensor.data.nbytes

print(f"{n_parameters=:,}")
print(f"{n_bytes=:,}")
Approximative value for weights is ~60GiB.
The context window is a fixed value for each model, for gpt-oss-120b it's 131,072 tokens (cf. model metadata).
For kv cache, we can just apply the formula from theory section.
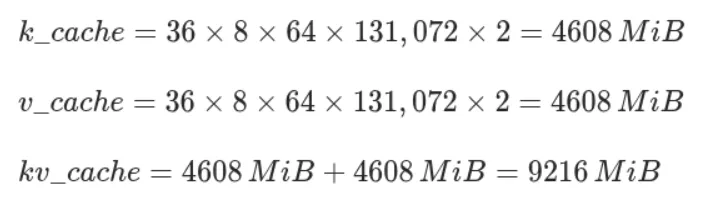
Bytes per KV cache element is a configurable value, FP16 is considered a good balance between precision and memory usage.
Side note: gpt-oss-120b is an "hybrid model" with half the layers using Sliding Window Attention mechanism (model card - 2.2 Attention) instead of full attention. In theory, this feature could reduce the kv cache footprint up to 50%. It is partially implemented by llama.cpp (#13194) but it's not yet clear if this feature is stable enough to properly interact with prompt caching. We decided to ignore it for now. If we end-up short on memory, vLLM has its own implementation (ref. Jenga paper).
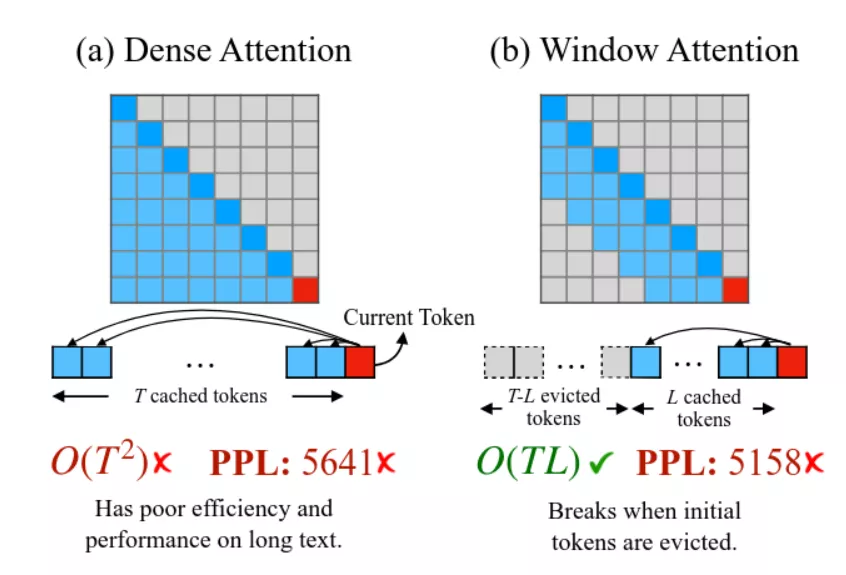
(source Efficient Streaming Language Models with Attention Sinks)
That being said, we wind up with a total minimal resident size of ~70GiB.
Not many GPUs are able to fit that much data in-memory. Page migration is still a backup option if proven usable. A common mitigation for memory lack is to aggregate multiple GPUs. Definitely a possible solution, but not really convenient from a sysadmin perspective: more physical space taken per LLM server instance, hardware assignation and administration fastidious, requires high PCI bus performances, etc.
With a retail price of ~9,000€ and a huge capacity of 96GB vRAM, Nvidia RTX Pro 6000 Max-Q Blackwell was with no doubt top hardware for our use case. That means we could fit the whole model and 4 parallel kv cache slots (avoid sharing cache data between users).

Exact memory size of RTX Pro 6000 is 97,887MiB. It seems that everything fits perfectly but remember above values are estimations, without padding alignment or additional transient buffers.
% nvidia-smi -q -d MEMORY

Attached GPUs                   : 1
GPU 00000000:01:00.0
    FB Memory Usage
        Total                   : 97887 MiB
        Reserved                : 637 MiB
        Used                    : 96084 MiB
        Free                    : 1167 MiB
We can either accept a fraction of the data in RAM, or reduce each context size, with an arbitrary "safety margin" of 2GiB. Reducing context size to 126,000 tokens is more than enough for our usage and matches all criteria.

The GPU being elected, we ordered a fully-fledged GPU server from a retailer with following specifications:
- AMD EPYC 9224
- ASUS ESC4000A-E12 2U (4 GPU slots)
- 128 GB DDR5 ECC memory
- RTX Pro 6000 Blackwell Max-Q (1 for qualification)

(source servers.asus.com)
Final setup summary:
- Isolated network → no internet access
- Isolated GPUs → one per project, 4 GPU slots available
- Isolated context inside GPU memory → one per user
- Shared model → one per GPU
Step 2: naive deployment
When deploying new services, we usually like to adopt an iterative approach: deploy once with bare minimal configuration so that we have a global vision of components interactions.
Then, we do take a closer look at each component with a sharpened eye, and apply relevant hardening to end-up with a low-privileged setup.
We did start with the simplest stack:
- OS: Debian 13 with proper hardening
- Inference server:
llama.cpp - LLM model:
gpt-oss-120b
For the sake of this article, this first deployment will be done "by hand" using shell commands.
Obviously, this could be automated using your favorite infra-as-code toolkit.
GPU Drivers
Well, we have an Nvidia GPU, and the standard backend for Nvidia GPUs is CUDA.
So first things first, let's install compute-only open nvidia drivers (ref. NVIDIA Driver Installation Guide):
% apt install linux-headers-$(uname -r)

% export version="1.1-1"
% export repository="https://developer.download.nvidia.com/compute/cuda/repos/debian13/x86_64"

# Nice try nvidia, but to be honest we don't really want to install
# a package to configure apt sources.
% wget -O - "${repository}/cuda-keyring_${version}_all.deb" | dpkg -x /dev/stdin .
% install -m 0644 ./usr/share/keyrings/cuda-archive-keyring.gpg /usr/share/keyrings/
% install -m 0644 ./etc/apt/sources.list.d/cuda-debian13-x86_64.list /etc/apt/sources.list.d/

% apt update
% apt install nvidia-driver-cuda nvidia-kernel-open-dkms cuda-toolkit-13

# Package "cuda-toolkit-13" installs dependency "nvidia-persistenced".
# This tool is used to reduce the cold start between GPU loads, we don't need that.
% vim /usr/lib/systemd/system-preset/nvidia.preset
disable nvidia-persistenced.service

% systemctl disable --now nvidia-persistenced.service
Now we can assert our GPU is detected by CUDA:
% nvidia-smi -L
GPU 0: NVIDIA RTX PRO 6000 Blackwell Max-Q Workstation Edition (UUID: GPU-xxx-xxx)
llama.cpp
llama.cpp is a popular, low-maintenance, batteries-included LLM inference server. It has few dependencies, simple stack, customizable memory management, large support of different model types, good potential integration with toolings. vLLM was another strong candidate, but is a more opinionated choice, focusing on high performances over daily usage.
Let's begin by downloading all model shards files:
% export repository="https://huggingface.co/ggml-org/gpt-oss-120b-GGUF/resolve/main"

% install -dm 0755 /var/lib/models
% for i in {1..3}; do wget -P /var/lib/models \
  "${repository}/gpt-oss-120b-mxfp4-0000${i}-of-00003.gguf"; done
Note that
llama.cppserver is not available in Debian repositories.
Moreover, performances do improve significantly at each release, so bleeding-edge inference it will be :)
Then, we have to build llama.cpp from sources, with CUDA backend:
% apt install git cmake build-essential libssl-dev
% git clone --depth 1 https://github.com/ggml-org/llama.cpp
% cmake -B build -DGGML_CUDA=ON -DCMAKE_CUDA_COMPILER=/usr/local/cuda-13/bin/nvcc ./llama.cpp
% cmake --build build [--parallel] --config Release

% ./build/bin/llama-cli --list-devices
ggml_cuda_init: found 1 CUDA devices:
  Device 0: NVIDIA RTX PRO 6000 Blackwell Server Edition, compute capability 12.0, VMM: yes
Available devices:
  CUDA0: NVIDIA RTX PRO 6000 Blackwell Server Edition (97252 MiB, 96694 MiB free)
Benchmark time!
% ./build/bin/llama-bench --model /var/lib/models/gpt-oss-120b-mxfp4-00001-of-00003.gguf -t 1 -fa 1 -b 2048 -ub 2048 -p 2048,8192,16384,32768,65536,131072 -ngl 99
ggml_cuda_init: found 1 CUDA devices:
  Device 0: NVIDIA RTX PRO 6000 Blackwell Max-Q Workstation Edition, compute capability 12.0, VMM: yes
| model                          |       size |     params | backend    | ngl | threads | n_ubatch | fa |            test |                  t/s |
| ------------------------------ | ---------: | ---------: | ---------- | --: | ------: | -------: | -: | --------------: | -------------------: |
| gpt-oss 120B MXFP4 MoE         |  59.02 GiB |   116.83 B | CUDA       |  99 |       1 |     2048 |  1 |          pp2048 |      8704.94 ± 20.84 |
| gpt-oss 120B MXFP4 MoE         |  59.02 GiB |   116.83 B | CUDA       |  99 |       1 |     2048 |  1 |          pp8192 |      8980.29 ± 10.49 |
| gpt-oss 120B MXFP4 MoE         |  59.02 GiB |   116.83 B | CUDA       |  99 |       1 |     2048 |  1 |         pp16384 |      8723.56 ± 13.68 |
| gpt-oss 120B MXFP4 MoE         |  59.02 GiB |   116.83 B | CUDA       |  99 |       1 |     2048 |  1 |         pp32768 |      8274.81 ± 65.17 |
| gpt-oss 120B MXFP4 MoE         |  59.02 GiB |   116.83 B | CUDA       |  99 |       1 |     2048 |  1 |         pp65536 |      7294.51 ± 10.20 |
| gpt-oss 120B MXFP4 MoE         |  59.02 GiB |   116.83 B | CUDA       |  99 |       1 |     2048 |  1 |        pp131072 |       5514.09 ± 5.41 |
| gpt-oss 120B MXFP4 MoE         |  59.02 GiB |   116.83 B | CUDA       |  99 |       1 |     2048 |  1 |           tg128 |        217.70 ± 0.55 |

build: ecd99d6 (1)
These are pretty good results given that benchmarks from Aug 18, 2025, approximately 6 months ago, with exact same hardware, reported nearly half t/s performances.
Alright, let's do some inference now:
Well, easy enough.
Step 3: orchestration and isolation
Running llama.cpp on the host works just fine. Nevertheless, we would like to add some isolation layer, especially for a multi-GPUs topology. Many isolation methods are available. We are modern people living in a modern world that relies on OCI containers for process and user isolation.
You may be thinking that containers are not the most secured box, especially because it means sharing nvidia kernel modules. From a security perspective, VMs with GPU passthrough would probably bring a stronger layer of isolation, yet it also has its downsides: degraded performances, non-trivial orchestration, fastidious upgrade procedures. We talked earlier about security trade-offs, and this is one of them. Isolated network, and auditable open-source driver code is a compromise decision we are willing to accept.
Podman is quite a great tool to securely manage local containers, as it natively supports rootless mode.
And what is also great about podman is that it natively supports a convenient device mapping feature specification called "CDI" (Container Device Interface).
What are CDI?
CDI is an extension of the builtin device OCI specification provided by CNCF, supported since podman v3.2.0.
Any file laying in /run/cdi or /var/run/cdi will be loaded by cdi-compatible container managers and will be injected in the container runtime call (following OCI runtime-spec).
The full CDI file fields specification is available in cncf-tags/container-device-interface repository (ref. SPEC.md)
Luckily for us, nvidia provides tooling for containers, including CDI file generation (ref. NVIDIA/nvidia-container-toolkit).
On Debian systems, it is shipped by package nvidia-container-toolkit.
# nvidia-container-toolkit-base is a dependency of nvidia-container-toolkit
# that provides most of the tooling.
% dpkg -L nvidia-container-toolkit-base
/etc/systemd/system/nvidia-cdi-refresh.service
/usr/bin/nvidia-cdi-hook
/usr/bin/nvidia-container-runtime
/usr/bin/nvidia-ctk
This package provides 3 binaries:
nvidia-cdi-hook: manages file and symlinks inside the containers.nvidia-container-runtime: wrapper around container runtime to bind devices. We don't need it as we are using podman integrated CDI capabilities.nvidia-ctk: various usage, including CDI file generation.
And a systemd service nvidia-cdi-refresh.service that keeps CDI files up-to-date.
; systemctl cat nvidia-cdi-refresh.service
; Some elements were removed for readability.

[Unit]
Description=Refresh NVIDIA CDI specification file
ConditionPathExists=|/usr/bin/nvidia-smi
ConditionPathExists=|/usr/sbin/nvidia-smi
ConditionPathExists=/usr/bin/nvidia-ctk

[Service]
ExecStart=/usr/bin/nvidia-ctk cdi generate
CapabilityBoundingSet=CAP_SYS_MODULE CAP_SYS_ADMIN CAP_MKNOD
At service startup, command nvidia-ctk cdi generate runs and — no surprise — generates the CDI file based on discovered hardware.
# /run/cdi/nvidia.yaml
# Some elements were removed for readability.

---
cdiVersion: 0.5.0
# Vendor and class device identifier
kind: nvidia.com/gpu
# Devices available to the container manager
# Ex. podman run --device nvidia.com/gpu=0
devices:
    - name: "0"
      containerEdits:
        # Bound devices inside the container
        deviceNodes:
            - path: /dev/nvidia0
    - name: all
      containerEdits:
        deviceNodes:
            - path: /dev/nvidia0
            - path: /dev/nvidia1
# Shared configuration across all above devices
containerEdits:
    env:
        - NVIDIA_CTK_LIBCUDA_DIR=/usr/lib/x86_64-linux-gnu
    deviceNodes:
        - path: /dev/nvidia-uvm
        - path: /dev/nvidia-uvm-tools
        - path: /dev/nvidiactl
    hooks:
        - hookName: createContainer
          path: /usr/bin/nvidia-cdi-hook
          args:
            - nvidia-cdi-hook
            - create-symlinks
            - --link
            - ../libnvidia-allocator.so.1::/usr/lib/x86_64-linux-gnu/gbm/nvidia-drm_gbm.so
            - --link
            - libglxserver_nvidia.so.590.48.01::/usr/lib/xorg/modules/extensions/libglxserver_nvidia.so
          env:
            - NVIDIA_CTK_DEBUG=false
    # Bind mounts between host and container
    mounts:
        - hostPath: /usr/bin/nvidia-cuda-mps-control
          containerPath: /usr/bin/nvidia-cuda-mps-control
          options:
            - ro
            - nosuid
            - nodev
            - rbind
            - rprivate
CDI files are almost only used by Nvidia to mount GPUs inside containers.
Podman CDI support was even implemented by an nvidia employee (ref. #10081).
Podman setup
Podman has a dedicated documentation for rootless setup, in 3 major steps:
1. Install podman
runc runtime, developed by the Open Container Initiative, is quite a standard in the container ecosystem.
% apt install --no-install-recommends podman runc

% vim /etc/containers/storage.conf
[storage]
driver = "overlay"

[storage.options.overlay]
ignore_chown_errors = "true"

% vim /etc/containers/containers.conf
[engine]
runtime = "/usr/sbin/runc"

% vim /etc/modules-load.d/overlay.conf
overlay

% useradd \
    --uid 10000 \
    --create-home \
    --home-dir /var/lib/containers/container01 \
    --shell /usr/sbin/nologin \
    --password '!' \
    container01
Note: from now on, consider all the following podman commands are run as system user "container01".
2. Setup networking
A user-mode networking tool for unprivileged network namespaces must be installed on the machine in order for Podman to run in a rootless environment.
It's not exactly true. A user-mode networking tool must be installed if you need some kind of networking, such as binding port. Good news for us, llama.cpp server can listen on an UNIX socket. This means we don't need a TCP/IP network stack in our container, which is both a performance and security win.
To make it work, we just need to run podman command with --network=none flag (or netns=none in containers.conf). As they say, the most secure network is no network :)
% podman run hello-world
Error: could not find pasta, the network namespace cannot be configured: exec: "pasta": executable file not found in $PATH

% podman run --network=none hello-world
!... Hello Podman World ...!

         .--"--.
       / -     - \
      / (O)   (O) \
   ~~~| -=(,Y,)=- |
    .---. /`  \   |~~
 ~/  o  o \~~~~.----. ~~
  | =(X)= |~  / (O (O) \
   ~~~~~~~  ~| =(Y_)=-  |
  ~~~~    ~~~|   U      |~~
3. Setup subuid/subgid mapping : user namespacing
Rootless Podman requires the user starting the container to have a range of UIDs listed in the files /etc/subuid and /etc/subgid.
It's not perfectly true as well. Mapping your current user with container root user 1:1 would not necessarily require any additional uid or gid range.
By default, the root user inside a container will be mapped to the user starting the container on the host (assumed --userns=host), so if we use i.e. host volumes, the container's processes will be able to access any file with the same system rights as the host user. This is already better than Docker's default "rootful" mode, where the root user inside the container is the real root user on the host (no user namespacing). Any security flaw in filesystem or process isolation would be a huge privilege escalation risk.
From a security perspective, we would probably like to map any big uid,gid on the system with an unprivileged user inside the container.
The main llama.cpp process inside the podman container runs as user debian (1000:1000) and on the host as uid 101000. It is not root inside the container, and does not even have container01 user rights on the host, which make privilege escalation way more difficult.
If your users' homes are managed by systemd-homed, subuid ranges must start at 524288 to avoid collisions (ref. rootless containers)
% apt install uidmap

# Add user container01 subid range
% usermod \
  --add-subuids 100000-101000 \
  --add-subgids 100000-101000 \
  container01

# Disable auto subuid provisioning at new users creation.
% grep 'SUB_.ID_COUNT' /etc/login.defs
SUB_UID_COUNT 0
SUB_GID_COUNT 0

% podman run --detach --rm --userns=keep-id --user 1000:1000 debian:trixie tail -f /etc/hosts
% ps -ef | grep tail
UID          PID    PPID  C STIME TTY          TIME CMD
101000    167172  167169  0 Mar11 pts/0    00:00:00 bash

% lsns --type user --tree
NS             TYPE  NPROCS    PID USER    COMMAND
4026531837     user     423      1 root    /sbin/init
└─4026532736   user       6 167141  container01 podman run --detach --rm --userns=keep-id --user 1000:1000 debian:trixie
  └─4026534507 user       1 167172 101000  tail -f /etc/hosts
Configure a reverse-proxy
Remember our llama.cpp server is listening on a UNIX socket file. Sockets are great for two major reasons: no network setup is required, and they rely on POSIX filesystem rights (DACLs or FACLs) to provide out of the box authenticated access to the underlying API.
In order to expose the WebUI to remote users, we need some kind of a reverse proxy provider. Many choices are available, we will go for a standard good old nginx server — although we could just make use of builtin systemd proxy socket integration systemd-socket-proxyd(8).
Linux ecosystem offers a wide range of process hardening capabilities. This topic is out of the study scope, high quality documentation is still available all over the internet:
- Systemd sandboxing (wiki.archlinux.org)
- Service sandboxing (wiki.debian.org)
- Systemd hardening made easy with SHH (synacktiv.com)
- apparmor(7), landlock(7), chroot(1), pivot_root(8), unshare(1), limits.conf(5)
Configuration file to start experimenting can be as simple as:
map "$request_method:$uri" "$whitelist" {
    default 0;

    "GET:/"                     1;
    "GET:/health"               1;
    "GET:/v1/health"            1;
    "GET:/props"                1;
    "GET:/models"               1;
    "GET:/v1/models"            1;

    "POST:/completions"          1;
    "POST:/v1/completions"       1;
    "POST:/chat/completions"     1;
    "POST:/v1/chat/completions"  1;
    "POST:/v1/messages"          1;
}

upstream container01 {
    server unix:/var/lib/containers/container01/socks/llama-cpp.sock;
}

server {
    listen 127.0.0.1:80;

    location / {
        if ($whitelist = 0) {
            return 403;
        }

        proxy_pass http://container01;
    }
}
Only necessary and audited API routes are whitelisted by the nginx map. Posterity will remember /slots API endpoint that used to leak all prompt data before they "made it secure" (cf. 0d161f0).
$ podman run -e LLAMA_SERVER_SLOTS_DEBUG=1 ghcr.io/ggml-org/llama.cpp:server-cuda13 --jinja [...]

$ curl http://localhost:8080/slots | jq -r '.[].prompt'
<|start|>system<|message|>You are Kevin Flynn<|end|>
<|start|>user<|message|>

Analyze this code for vulnerabilities
--- File: cve-2002-0639 ---
nresp = packet_get_int();

if (nresp > 0) {
 response = xmalloc(nresp*sizeof(char*));

 for (i = 0; i < nresp; i++)
  response[i] = packet_get_string(NULL);
}
<|end|>
In order to tighten security access, we can rely on ssh authentication gateway instead of exposing a port over the corporate network.
That is why the server listens on 127.0.0.1 instead of its own coporate network IP address.
# Forward nginx server port 80 to local machine port 8080
% ssh -J bastion.local -NL 8080:127.0.0.1:80 server.local
Run llama.cpp
We are good to go. All llama.cpp server options are documented on the project wiki.
Final command would look something like this:
# Note we have to force socket creation mode to 770
# to keep proper access rights
% podman run --rm --network none -d \
    --user 1000:1000 \
    --userns=keep-id \
    --umask=007 \
    --device nvidia.com/gpu=0 \
    --volume /var/lib/models:/models:ro \
    --volume /var/lib/containers/container01/socks:/run/llama-cpp \
    ghcr.io/ggml-org/llama.cpp:server-cuda13 \
        --host /run/llama-cpp/llama-cpp.sock \
        --model /models/gpt-oss-120b-mxfp4-00001-of-00003.gguf \
        --alias gpt-oss-120b \
        --ctx-size 504000  \    # 126,000 tokens x 4 slots
        --parallel 4 \          # 4 slots (implies --no-kv-unified)
        --no-slots \            # Disable slot monitoring
        --swa-full              # Disable SWA reduced cache

23ed38fddcd8

% podman logs -f 23ed38fddcd8
ggml_cuda_init: found 1 CUDA devices:
  Device 0: NVIDIA RTX PRO 6000 Blackwell Max-Q Workstation Edition, compute capability 12.0, VMM: yes
[...]
main: server is listening on unix:///run/llama-cpp/llama-cpp.sock
Container startup
Next step is to make the containers auto-start and auto-configure at system boot.
Among all the available solutions, we went for the podman quadlets.
Quadlets are an extended version of systemd services, crafted for containers (ref. podman-systemd.unit)
It offers many abstractions such as .container, .network, .image, ...
Based on systemd generators, any definition file will trigger underlying provision of an actual systemd service.
Suppose user container01 has uid=1000,gid=1000, previous podman command quadlet format would be:
; /etc/containers/systemd/users/10000/llama-cpp.container

[Unit]
Description=llama.cpp CUDA server

[Container]
Image=ghcr.io/ggml-org/llama.cpp:server-cuda13
AutoUpdate=disabled
AddDevice=nvidia.com/gpu=0
Network=none

Volume=/var/lib/models:/models:ro
Volume=/var/lib/containers/container01/socks:/run/llama-cpp

; Simple healthcheck command
HealthStartPeriod=1m
HealthCmd=/usr/bin/test -S /run/llama-cpp/llama-cpp.sock

User=1000
Group=1000
UserNS=keep-id

NoNewPrivileges=true

; Force socket creation mode
PodmanArgs=--umask=007

Exec=\
  --host "/run/llama-cpp/llama-cpp.sock" \
  --model /models/gpt-oss-120b-mxfp4-00001-of-00003.gguf \
  --alias gpt-oss-120b \
  --ctx-size 504000 \
  --parallel 4 \
  --no-slots \
  --swa-full

[Quadlet]
DefaultDependencies=false

[Service]
Restart=on-failure

[Install]
WantedBy=default.target
Enabling linger mode will trigger systemd generators for user container01 and hopefully start our containerized LLM server.
% loginctl enable-linger container01

% pstree -SctuZ
systemd(`sd-pam (enforce)`)
 ├─nginx(mnt,uts,`nginx (enforce)')
 │  ├─nginx(www-data,`nginx (enforce)')
 │  ├─nginx(www-data,`nginx (enforce)')
 │  └─nginx(www-data,`nginx (enforce)')
 └─systemd(container01,mnt,`sd-pam (enforce)')
    ├─conmon(mnt,user,`podman (enforce)')
    │  └─llama-server(cgroup,ipc,mnt,net,pid,uts,`container (enforce)')
    │     ├─{cuda-EvtHandlr}(`container (enforce)')
    │     ├─{cuda00001400006}(`container (enforce)')
    │     ├─{llama-server}(`container (enforce)')
    │     ├─[...]
    │     └─{llama-server}(`container (enforce)')
    └─podman pause(mnt,user,`container (enforce)')

% cat /run/user/10000/systemd/generator/llama-cpp.service
# This command outputs the generated systemd service for user 1000
# based on provided podman and quadlet configuration files.
Step 4: improvements
It may come as a surprise, but standard LLM deployment setup come with lot of useless stuff.
We don't really like useless dependencies as it increases the overall attack surface.
Let's dig in.
Kernel modules
First, a magic trick:
% lsmod | grep nvidia
nvidia              16248832  6 nvidia_modeset

% ./build/bin/llama-cli --list-devices
[...]

% lsmod | grep nvidia
nvidia_uvm           2048000  0
nvidia              16248832  7 nvidia_uvm
Surprise, new kernel module!
As expected each module is well documented online, right nvidia?
Nope. Nothing.
You might say we could "guess" based on the names, but it's not
a very comprehensive approach.
% man nvidia-
nvidia-cuda-mps-control  nvidia-cuda-mps-server  nvidia-modprobe  nvidia-persistenced  nvidia-smi

# Best we have is nvidia-modprobe
% man nvidia-modprobe
NAME
  nvidia-modprobe - Load the NVIDIA kernel module and create NVIDIA character device files.

% tree /usr/share/doc/nvidia-*
/usr/share/doc/nvidia-driver-cuda
├── changelog.Debian.gz
├── changelog.gz
└── copyright
/usr/share/doc/nvidia-kernel-open-dkms
├── changelog.Debian.gz
└── copyright
/usr/share/doc/nvidia-kernel-support
├── changelog.Debian.gz
├── changelog.gz
└── copyright
/usr/share/doc/nvidia-modprobe
├── changelog.Debian.gz
└── copyright
/usr/share/doc/nvidia-opencl-icd
├── changelog.Debian.gz
├── changelog.gz
└── copyright
/usr/share/doc/nvidia-persistenced
├── changelog.Debian.gz
└── copyright

Well guess what, after some package forensic, turned-out the doc is only shipped with desktop package nvidia-driver.
Damn nvidia!
% apt download nvidia-driver
% dpkg --contents nvidia-driver*
-rw-r--r-- root/root 10530 2025-12-08 12:36 ./usr/share/doc/nvidia-driver/html/index.html
[...]
Alright, now we have a chapter Chapter 5. Listing of Installed Components that provides us with all relevant information.
nvidia.ko: provides low-level access to your Nvidia hardwarenvidia-modeset.ko: this kernel module is responsible for programming the display engine of the GPUnvidia-peermem.ko: allows Mellanox HCAs access to NVIDIA GPU memory read/write buffers without needing to copy data to host memory. (aka. instead of RDMA through infiniband-like interco)nvidia-uvm.ko: Unified Memory kernel module; this kernel module provides functionality for sharing memory between the CPU and GPU in CUDA programs. It is generally loaded into the kernel when a CUDA program is started, and is used by the CUDA driver on supported platforms.
Chapter 36. Direct Rendering Manager Kernel Modesetting (DRM KMS)
nvidia-drm.ko: registers a DRM driver with the DRM subsystem of the Linux kernel. Creates dri devices /dev/dri/card* and /dev/dri/renderD* (see. docs.kernel.org, wikipedia).
Let's recap and see what is required for us and what is not:
nvidia.ko(required): core modulenvidia-modeset.ko(useless): we don't need display enginenvidia-peermem.ko(useless): we don't need RDMAnvidia-uvm.ko(maybe): we don't need Unified Memory as we have enough vRAM to fit the entire LLM data. But maybellama.cppuses it, we will see that laternvidia-drm.ko(useless): CUDA uses/dev/nvidia*devices, not the dri devices
Continuing with our iterative approach, we will now decide which module is mandatory for CUDA and then blacklist the rest.
# Disabling kernel module loading is a capital security measure in production servers.
# Loading modules is one of the favourite way for attackers to compromise a system
# and elevate privileges.
# sysctl.d(5)
% echo 1 > /proc/sys/kernel/modules_disabled

% lsmod | grep nvidia
nvidia              16248832  0

% ./build/bin/llama-cli --list-devices
ggml_cuda_init: failed to initialize CUDA: unknown error
Available devices:

% strace -f -e execve ./build/bin/llama-cli --list-devices 2>&1
execve("./build/bin/llama-cli", ["./build/bin/llama-cli", "--list-devices"], 0x7ffec8576210 /* 19 vars */) = 0
[pid 42346] execve("/sbin/modprobe", ["modprobe", "nvidia-uvm"], 0x7f95e382e870 /* 1 var */) = 0
ggml_cuda_init: failed to initialize CUDA: unknown error
Available devices:
Here CUDA tries to opportunistically load a kernel module behind our backs, but is blocked.
Bad nvidia!
% lsmod | grep nvidia
nvidia_uvm           2048000  0
nvidia              16248832  6 nvidia_uvm

% ./build/bin/llama-cli --list-devices
ggml_cuda_init: found 1 CUDA devices:
  Device 0: NVIDIA RTX PRO 6000 Blackwell Server Edition, compute capability 12.0, VMM: yes
Available devices:
  CUDA0: NVIDIA RTX PRO 6000 Blackwell Server Edition (97252 MiB, 96694 MiB free)
So far so good, we have our minimal driver setup.
In strace we have 3 information:
openat(AT_FDCWD, "/dev/nvidiactl", O_RDWR|O_CLOEXEC)
openat(AT_FDCWD, "/dev/nvidia0", O_RDWR|O_CLOEXEC)
openat(AT_FDCWD, "/dev/nvidia-uvm", O_RDWR|O_CLOEXEC)
- CUDA uses
nvidiactl(at least) to enumerate devices. - CUDA uses device node
/dev/nvidia*to interact with the GPUs. - CUDA uses device node
/dev/nvidia-uvm, for some reason.
The nvidia-uvm problem
Unified Virtual Memory is a memory management system developed by Nvidia, based on dynamic pages migration, to create an "unified" memory space between CPU RAM and GPU vRAM. By offloading GPU memory in RAM, programs can compute datasets larger that the vRAM capacity without too much of a performance degradation.
No doubt it's a first-class target for attacker seeking confidential LLM data.
For us, this feature seems totally pointless as we are fitting the entire load inside our vRAM. That's it, no page migration needed.
In CUDA code, uvm usage is quite explicit: cudaMalloc() function call is replaced by cudaMallocManaged() to explicitly query managed memory from CUDA engine.
Lucky us, llama.cpp do not use uvm by default, and only calls cudaMallocManaged() if GGML_CUDA_ENABLE_UNIFIED_MEMORY variable is exported. Problem solved, right?
Unfortunately, according to some random people on the internet, CUDA depends on uvm since version 6 or 7 or 8 (still highly undocumented by Nvidia), even if it's never explicitly called in the code. CUDA runtime initialization spawns child process to load nvidia_uvm instead of running in degraded mode. It seems like the runtime unconditionally requires nvidia_uvm to be present even for non-UVM workloads.
Based on open-kernel module code, we can speculate that CUDA relies on this module, not only for unified memory, but its entire virtual space management (VUA), GPU fault handling, and memory eviction.

System devices
By default, GPU devices node are world-readable and writable:
% ls -l /dev/nvidia0
crw-rw-rw- 1 root root 195, 0 Feb 26 14:30 /dev/nvidia0
No worries, that does not automatically mean that everyone can read the whole GPU memory. Devices are special kind of files, that reimplement all standard file operations such as open(), write(), and handle ioctl() calls as they want.
About nvidia* device nodes, they handle dynamic memory allocation table inside GPU vRAM.
Two issues:
- Any exploit in this device implementation could lead to global GPU memory compromission from any user on the system.
- Everyone can write data inside the GPU, and we don't want to share memory with other processes.
So let's see if nvidia kernel module has some options for us to fix that, so that their device files are created with hardened POSIX permissions:
% modinfo nvidia
[...]
parm:           NVreg_DeviceFileUID:int
parm:           NVreg_DeviceFileGID:int
parm:           NVreg_DeviceFileMode:int
Perfect, we can apply some restrictions:
# Restrict device access to root
% vim /etc/modprobe.d/nvidia-devices.conf
options nvidia NVreg_DeviceFileUID=0
options nvidia NVreg_DeviceFileGID=0
options nvidia NVreg_DeviceFileMode=0660

# Blacklist useless modules
% vim /etc/modprobe.d/nvidia-blacklist.conf
blacklist nvidia_drm
blacklist nvidia_modeset
blacklist nvidia_peermem

# Autoload nvidia modules at system boot
% vim /etc/modules-load.d/nvidia.conf
nvidia
nvidia_uvm

% update-initramfs -u
% systemctl reboot

% lsmod | grep nvidia
nvidia_uvm           2048000  4
nvidia              16273408  40 nvidia_uvm

% ls -l /dev/nvidia*
crw-rw---- 1 root  root  195,   0 Feb 26 14:32 /dev/nvidia0
crw-rw---- 1 root  root  195, 255 Feb  9 14:26 /dev/nvidiactl
crw-rw-rw- 1 root  root  236,   0 Feb  9 14:26 /dev/nvidia-uvm
nvidia-uvm device node is not created with the same mode as nvidiaX or nvidiactl.nvidia-modprobe binary which is called by an udev rule when nvidia kernel module is loaded.
# /usr/lib/udev/rules.d/60-nvidia.rules

ACTION=="add|bind", KERNEL=="nvidia", RUN+="/usr/bin/nvidia-modprobe"
nvidiaXandnvidiactlare created bynvidia_mknod()function - nvidia-modprobe-utils.c#L642.nvidia-uvmis created bynvidia_uvm_mknod()function - nvidia-modprobe-utils.c#L803
Both of these functions are then calling mknod_helper() (function creating the device node), yet the first one gives an additional argument NV_PROC_REGISTRY_PATH.
/* Most of the code was remove for readability */

#define NV_PROC_REGISTRY_PATH "/proc/driver/nvidia/params"
#define NV_DEVICE_FILE_MODE (S_IRUSR|S_IWUSR|S_IRGRP|S_IWGRP|S_IROTH|S_IWOTH)

int nvidia_mknod(int minor)
{
  // mknod is called with proc_path = "/proc/driver/nvidia/params"
  return mknod_helper(NV_MAJOR_DEVICE_NUMBER, minor, path, NV_PROC_REGISTRY_PATH);
}

int nvidia_uvm_mknod(int base_minor)
{
  // mknod is called with proc_path = NULL
  return mknod_helper(major, base_minor, NV_UVM_DEVICE_NAME, NULL);
}

static int mknod_helper(int major, int minor, const char *path, const char *proc_path)
{
    mode_t mode;

    init_device_file_parameters(&uid, &gid, &mode, &modification_allowed, proc_path);
}

static void init_device_file_parameters(uid_t *uid, gid_t *gid, mode_t *mode, int *modify, const char *proc_path)
{
    FILE *fp;
    unsigned int value;

    *mode = NV_DEVICE_FILE_MODE;  // default value as defined above

    if (proc_path == NULL) {
        return; // nvidia-uvm returns with no mode set
    }

    fp = fopen(proc_path, "r");

    while (fscanf(fp, "%31[^:]: %u\n", name, &value) == 2) {
        if (strcmp(name, "DeviceFileMode") == 0) {
            *mode = value;  // mode is set
        }
    }
}
Well, end of digression. To update nvidia-uvm rights we have a few options:
- Add another udev rule
- Recompile with flag
-DNV_DEVICE_FILE_MODE=0660 - Monitor device creation and trigger mode change
Solution 1. is not really possible as udev rules won't properly work with mknod being handled by nvidia-modprobe.
Solution 2. is doable but it's tedious and won't really solve the whole issue anyway.
Solution 3. is probably our best candidate so far. We will make use of systemd builtin.path services that monitor system paths and trigger an associated systemd service.
The goal is to modify the device mode to 0660 in order to prevent interaction from external entities, while still allowing access for unprivileged subid users (since the device is owned by root:root). A great option is to make use of Linux ACLs to grant access to a specified list of unprivileged users.
# /etc/systemd/system/nvidia-uvm.path

[Unit]
Description=Watch for nvidia-uvm device creation

[Path]
PathExists=/dev/nvidia-uvm

[Install]
WantedBy=multi-user.target

# /etc/systemd/system/nvidia-uvm.service

[Unit]
Description=Set nvidia-uvm device permissions

[Service]
Type=oneshot
ExecStart=/bin/chmod 660 /dev/nvidia-uvm
ExecStart=/usr/bin/setfacl -m u:101000:rw /dev/nvidia-uvm
And same issue goes for nvidiactl and any nvidiaX devices.
We can rework the unit files to make them a bit more generic:
# /etc/systemd/system/nvidia-devices@.path

[Unit]
Description=Watch for /dev/%I device creation

[Path]
PathExists=/dev/%I

[Install]
WantedBy=multi-user.target

# /etc/systemd/system/nvidia-devices@.service

[Unit]
Description=Set /dev/%I permissions

[Service]
Type=oneshot
EnvironmentFile=-/etc/nvidia/%I.conf
ExecStart=/bin/chmod 660 /dev/%I
ExecStart=/usr/bin/sh -c \
  'for uid in ${OWNER_UIDS}; do /usr/bin/setfacl -m u:$uid:rw /dev/%I; done'
Then we just have to configure owners for each device, and start the generic service to make it work:
# Example for two users sharing nvidiactl and nvidia-uvm devices
% echo 'OWNER_UIDS="101000 201001"' > /etc/nvidia/nvidia-uvm.conf
% echo 'OWNER_UIDS="101000 201001"' > /etc/nvidia/nvidiactl.conf
% echo 'OWNER_UIDS="101000"' > /etc/nvidia/nvidia0.conf
% echo 'OWNER_UIDS="201001"' > /etc/nvidia/nvidia1.conf

% systemctl enable --now 'nvidia-devices@nvidia\x2duvm.path'
% systemctl enable --now 'nvidia-devices@nvidiactl.path'
% systemctl enable --now 'nvidia-devices@nvidia0.path'
% systemctl enable --now 'nvidia-devices@nvidia1.path'
% getfacl /dev/nvidia*

# file: dev/nvidia-uvm
# owner: root
# group: root
user::rw-
user:101000:rw-
user:201001:rw-
group::rw-
mask::rw-
other::---

# file: dev/nvidiactl
# owner: root
# group: root
user::rw-
user:101000:rw-
user:201001:rw-
group::rw-
other::---

# file: dev/nvidia0
# owner: root
# group: root
user::rw-
user:101000:rw-
group::rw-
other::---

# file: dev/nvidia1
# owner: root
# group: root
user::rw-
user:201001:rw-
group::rw-
other::---
Good enough, at this point, we have a minimal CUDA setup with:
/dev/nvidia0(root:root + facl 101000)/dev/nvidia1(root:root + facl 201001)/dev/nvidiactl(root:root + facl 101000 + facl 201...)/dev/nvidia-uvm(root:root + facl 101000 + facl 201...)
Nonetheless,
nvidiaX devices can be bound to a uniq system group, one per gpu, still nvidiactl and (worse) nvidia-uvm have to be shared by all process using GPUs. And, from a security perspective, it's really annoying.
Remember /dev/nvidia-uvm is a single device that provides access to memory management across all GPUs in the system. Anyone with device open permission could potentially craft an exploit to gain access to UVM virtual address space across all GPUs.

Perhaps, there is still another viable option.
Vulkan backend
llama.cpp also supports Vulkan backend, which is a versatile standardized cross-platform and cross-vendor graphics and compute API.
Deploying llama.cpp with vulkan is quite similar to CUDA.
% apt install nvidia-kernel-open-dkms nvidia-driver-libs [vulkan-tools]

% vulkaninfo --summary
==========
VULKANINFO
==========

Vulkan Instance Version: 1.4.309

Devices:
========
GPU0:
        apiVersion         = 1.4.325
        driverVersion      = 590.48.1.0
        vendorID           = 0x10de
        deviceID           = 0x2bb5
        deviceName         = NVIDIA RTX PRO 6000 Blackwell Server Edition
        driverName         = NVIDIA
Before nvidia-container-toolkit we have to install nvidia-smi, as nvidia-cdi-refresh.service needs it to run ConditionPathExists=/usr/bin/nvidia-smi (cf. Step 3: orchestration and isolation).
A "nvidia-smi" package exists in nvidia repositories but it does not provide nvidia-smi binary at all, probably for some backward compatibility
This is a transitional dummy package, it can be safely removed.
Actual binary is shipped within CUDA driver package:
% apt download nvidia-driver-cuda
% dpkg -x nvidia-driver-cuda_590.48.01-1_amd64.deb .
% install -m 0755 ./usr/bin/nvidia-smi /usr/bin

% apt install nvidia-container-toolkit

% podman run -it --rm --device nvidia.com/gpu=0 --entrypoint /app/llama-bench --volume /var/lib/models:/models:ro ghcr.io/ggml-org/llama.cpp:full-vulkan --model /mnt/models/gpt-oss-120b-mxfp4-00001-of-00003.gguf -t 1 -fa 1 -b 2048 -ub 2048 -p 2048,8192,16384,32768,65536,131072 -ngl 99

ggml_vulkan: Found 1 Vulkan devices:
ggml_vulkan: 0 = NVIDIA RTX PRO 6000 Blackwell Max-Q Workstation Edition | uma: 0 | fp16: 1 | bf16: 0 | warp size: 32 | shared memory: 49152 | int dot: 1 | matrix cores: NV_coopmat2
| model                          |       size |     params | backend    | ngl | threads | n_ubatch | fa |            test |                  t/s |
| ------------------------------ | ---------: | ---------: | ---------- | --: | ------: | -------: | -: | --------------: | -------------------: |
| gpt-oss 120B MXFP4 MoE         |  59.02 GiB |   116.83 B | Vulkan     |  99 |       1 |     2048 |  1 |          pp2048 |      7976.25 ± 48.33 |
| gpt-oss 120B MXFP4 MoE         |  59.02 GiB |   116.83 B | Vulkan     |  99 |       1 |     2048 |  1 |          pp8192 |      8204.88 ± 10.63 |
| gpt-oss 120B MXFP4 MoE         |  59.02 GiB |   116.83 B | Vulkan     |  99 |       1 |     2048 |  1 |         pp16384 |      8091.26 ± 61.02 |
| gpt-oss 120B MXFP4 MoE         |  59.02 GiB |   116.83 B | Vulkan     |  99 |       1 |     2048 |  1 |         pp32768 |      7642.83 ± 10.28 |
| gpt-oss 120B MXFP4 MoE         |  59.02 GiB |   116.83 B | Vulkan     |  99 |       1 |     2048 |  1 |         pp65536 |       6755.33 ± 8.83 |
| gpt-oss 120B MXFP4 MoE         |  59.02 GiB |   116.83 B | Vulkan     |  99 |       1 |     2048 |  1 |        pp131072 |       5404.22 ± 3.21 |
| gpt-oss 120B MXFP4 MoE         |  59.02 GiB |   116.83 B | Vulkan     |  99 |       1 |     2048 |  1 |           tg128 |        217.36 ± 0.03 |

build: ecd99d6 (1)
To be honest, we thought that CUDA would highly dominate the compute performance of Vulkan. In the end, the gap does not feel that significant!
|
Vulkan
|
CUDA
|
Test
|
Performance gap
|
|---|---|---|---|
|
7976.25
|
8704.94
|
pp2048
|
9.14%
|
|
8204.88
|
8980.29
|
pp8192
|
9.45%
|
|
8091.26
|
8723.56
|
pp16384
|
7.81%
|
|
7642.83
|
8274.81
|
pp32768
|
8.27%
|
|
6755.33
|
7294.51
|
pp65536
|
7.98%
|
|
5404.22
|
5514.09
|
pp131072
|
2.03%
|
|
217.36
|
217.7
|
tg128
|
0.16%
|
No CUDA means no uvm device to bind inside the container.
And with such a small performance gap, especially for long contexts, Vulkan appears to be a very good performance to security trade-off.
What about nvidiactl?
nvidiaX and nvidiactl driver codes are highly entangled. They even use the same ioctl() calls dispatcher (ref. nv.c).
But nvidiactl is way less dangerous than nvidia-uvm as no compute operations, nor any GPU memory access can be performed through this device. It serves following purposes:
- Discover available GPUs, get metadata (version, capabilities, ...)
- Request context creation on a specific GPU
Even if a malicious process has /dev/nvidiactl open, it cannot bypass the permission check on /dev/nvidiaX device.
AppArmor
AppArmor is a kernel enhancement to confine programs to a limited set of resources.
man apparmor(7)
To be "ceinture et bretelles" ("belt-and-braces"), AppArmor provides another layer of defense in depth with multiple isolation levels, and brings auditability as any denied access attempt will be reported in kernel logs.
Here is an example abstraction snippet to confine llama.cpp container access to required resources only:
# /etc/apparmor.d/abstractions/llama-cpp

  # Deny dangerous capabilities
  deny capability sys_admin,
  deny capability sys_module,
  deny capability sys_rawio,
  deny capability sys_ptrace,
  deny capability mac_admin,
  deny capability mac_override,

  # Shared library access
  /lib/x86_64-linux-gnu/** mr,
  /usr/lib/x86_64-linux-gnu/** mr,
  /lib64/** mr,

  # Vulkan runtime and drivers
  /usr/lib/x86_64-linux-gnu/libvulkan.so* mr,
  /usr/lib/x86_64-linux-gnu/vulkan/** mr,
  /usr/share/vulkan/** r,

  # NVIDIA Vulkan driver
  /usr/lib/x86_64-linux-gnu/libnvidia-*.so* mr,
  /usr/lib/x86_64-linux-gnu/nvidia/** mr,
  /usr/share/nvidia/** r,
  /usr/share/glvnd/** r,

  # Shared control devices
  /dev/nvidiactl rw,
  /dev/nvidia0 rw,

  # Adapt to proper PCI device number
  /sys/devices/pci0000:00 rw,

  # User home
  owner /var/lib/containers/container01 r,
  owner /var/lib/containers/container01/** rw,

  # Shared model read-only access
  /var/lib/models r,
  /var/lib/models/** r,
Final step: walkthrough
#########################################
# Disable module loading during install #
#########################################
% echo 1 > /proc/sys/kernel/modules_disabled

###################################################
# Disable auto subuid provisionning for new users #
###################################################
% gawk -i inplace '/^SUB_(UID|GID)_COUNT/{$2=0}1' /etc/login.defs

#############################
# Install container tooling #
#############################
% apt install --no-install-recommends podman runc uidmap
% install -m 0644 /dev/stdin /etc/modules-load.d/overlay.conf << EOF
overlay
EOF

#####################################
# Add unprivileged container01 user #
#####################################
% useradd \
    --uid 10000 \
    --create-home \
    --home-dir /var/lib/containers/container01 \
    --shell /usr/sbin/nologin \
    --password '!' \
    container01

% usermod \
  --add-subuids 100000-101000 \
  --add-subgids 100000-101000 \
  container01

% install -dm 770 -g www-data -o container01 /var/lib/containers/container01/socks
% setfacl -m u:101000:rwx /var/lib/containers/container01/socks

#####################################
# Install nvidia and vulkan drivers #
#####################################
% export version="1.1-1"
% export repository="https://developer.download.nvidia.com/compute/cuda/repos/debian13/x86_64"
% wget -O - "${repository}/cuda-keyring_${version}_all.deb" | dpkg -x /dev/stdin .
% install -m 0644 ./usr/share/keyrings/cuda-archive-keyring.gpg /usr/share/keyrings/
% install -m 0644 ./etc/apt/sources.list.d/cuda-debian13-x86_64.list /etc/apt/sources.list.d/
% apt update
% apt install linux-headers-$(uname -r)
% apt install nvidia-kernel-open-dkms nvidia-driver-libs
% install -m 0644 /dev/stdin /etc/modules-load.d/nvidia.conf << EOF
nvidia
EOF

###########################
# Fix devices permissions #
###########################
% install -m 0644 /dev/stdin /etc/modprobe.d/nvidia-devices.conf << EOF
options nvidia NVreg_DeviceFileUID=0
options nvidia NVreg_DeviceFileGID=0
options nvidia NVreg_DeviceFileMode=0660
EOF

% install -m 0644 /dev/stdin /etc/modprobe.d/nvidia-blacklist.conf << EOF
blacklist nvidia_uvm
blacklist nvidia_drm
blacklist nvidia_modeset
blacklist nvidia_peermem
EOF

% install -m 0644 /dev/stdin /etc/systemd/system/nvidia-devices@.path << EOF
[Unit]
Description=Watch for /dev/%I device creation

[Path]
PathExists=/dev/%I

[Install]
WantedBy=multi-user.target
EOF

% install -m 0644 /dev/stdin /etc/systemd/system/nvidia-devices@.service << EOF
[Unit]
Description=Set /dev/%I permissions

[Service]
Type=oneshot
EnvironmentFile=-/etc/nvidia/%I.conf
ExecStart=/bin/chmod 660 /dev/%I
ExecStart=/usr/bin/sh -c \
  'for uid in \${OWNER_UIDS}; do /usr/bin/setfacl -m u:\$uid:rw /dev/%I; done'
EOF

% install -dm 755 /etc/nvidia
% echo 'OWNER_UIDS="101000"' > /etc/nvidia/nvidia-uvm.conf
% echo 'OWNER_UIDS="101000"' > /etc/nvidia/nvidiactl.conf
% echo 'OWNER_UIDS="101000"' > /etc/nvidia/nvidia0.conf
% systemctl enable --now 'nvidia-devices@nvidia\x2duvm.path'
% systemctl enable --now 'nvidia-devices@nvidiactl.path'
% systemctl enable --now 'nvidia-devices@nvidia0.path'

% update-initramfs -u
% systemctl reboot

#############################
# Install container toolkit #
#############################
% apt download nvidia-driver-cuda
% dpkg -x nvidia-driver-cuda_*_amd64.deb .
% install -m 0755 ./usr/bin/nvidia-smi /usr/bin

% curl https://nvidia.github.io/libnvidia-container/gpgkey | gpg --dearmor -o /usr/share/keyrings/nvidia-container-toolkit-keyring.gpg

% install -m 0644 /dev/stdin /etc/apt/sources.list.d/nvidia-container-toolkit.list << EOF
deb [signed-by=/usr/share/keyrings/nvidia-container-toolkit-keyring.gpg] https://nvidia.github.io/libnvidia-container/stable/deb/\$(ARCH) /
EOF

% apt update
% apt install nvidia-container-toolkit

############################
# Configure podman runtime #
############################
% export repository="https://huggingface.co/ggml-org/gpt-oss-120b-GGUF/resolve/main"
% install -dm 0755 /var/lib/models
% for i in {1..3}; do wget -P /var/lib/models \
  "${repository}/gpt-oss-120b-mxfp4-0000${i}-of-00003.gguf"; done

% install -dm 755 /etc/containers/systemd/users/10000
% install -m 0644 /dev/stdin /etc/containers/systemd/users/10000/llama-cpp.container << EOF
[Unit]
Description=llama.cpp Vulkan server

[Container]
Image=ghcr.io/ggml-org/llama.cpp:server-vulkan
AutoUpdate=disabled
AddDevice=nvidia.com/gpu=0
Network=none

Volume=/var/lib/models:/models:ro
Volume=/var/lib/containers/container01/socks:/run/llama-cpp

; Simple healthcheck command
HealthStartPeriod=1m
HealthCmd=/usr/bin/test -S /run/llama-cpp/llama-cpp.sock

User=1000
Group=1000
UserNS=keep-id

NoNewPrivileges=true

; Force socket creation mode
PodmanArgs=--umask=007

Exec=\
  --host "/run/llama-cpp/llama-cpp.sock" \\
  --model /models/gpt-oss-120b-mxfp4-00001-of-00003.gguf \\
  --alias gpt-oss-120b \\
  --ctx-size 504000 \\
  --parallel 4 \\
  --no-slots \\
  --swa-full

[Quadlet]
DefaultDependencies=false

[Service]
Restart=on-failure

; Remove previous socket if necessary
ExecStartPre=/usr/bin/rm -f /var/lib/containers/container01/socks/llama-cpp.sock

[Install]
WantedBy=default.target
EOF

% loginctl enable-linger container01
Conclusion
Once again, this first iteration is deliberately minimalist: no vector database, no fine-tuning, no agents, no external connectors. The next steps will likely involve data persistence, tooling plugins, model fine-tuning, documentation and codebase indexing. Each of these will inevitably reopen some interesting security questions we’ve carefully kept out of scope for now.
That being said, this is not 100% bulletproof facing sophisticated attacks — if such a thing was even an actual reality. Containers share the host kernel, nvidiactl is still a shared device across GPUs, and certain parts of the code (ie. Vulkan, for which we don’t have the sources) are beyond audit, forcing us to adopt a “trust us” stance, despite some lingering reservations which we discovered along the way.
As always, it’s in the gap between “it works” and “we’re happy with how it works” where the real stake lies. And ultimately, with all the seriousness this process demands (and the emotion that comes with it), we now have a trusted LLM server to which we can confidently feed — with great peace of mind — company sensitive data and start gathering the long-awaited benefits! 🙂