Diving into ADB protocol internals (1/2)
For those having experience working on Android devices, you may already be familiar with a useful tool called adb. This tool is invaluable for debugging, offering a unified way to execute shell commands, transfer files, install APKs, and much more. In this first blogpost, we will explore its underlying protocol between client and server and introduce a Rust crate called adb_client implementing it.
Vous souhaitez améliorer vos compétences ? Découvrez nos sessions de formation ! En savoir plus
Why dig deeper ?
It’s a fair question, especially since ADB’s source code is open-source and freely available, and that the command line tool already performs all the necessary job. However, delving deeper into ADB offers several benefits:
- Gaining Internal Insights: Understanding how things work under the hood can provide a deeper knowledge of the system.
- Eliminating System Package Dependencies: Avoiding dependencies on system packages like
android-toolson dnf oradbon apt can prove useful, particularly in fully offline environments where installing these packages might be tricky or not possible at all. The goal of this library is to only depend on a Rust crates mirror (something you might already have if you're working on a Rust project btw). - Avoiding Executing External Binaries: Directly using the underlying protocol is more efficient than running external binaries. This approach eliminates the need for process creation and simplifies error handling.
- Robust Output Parsing: Implementing a solution that directly interacts with the protocol can ease output handling and avoid inconsistencies that may arise from different stdout/stderr formats across android versions or even vendors.
All of these factors led us to develop and release a Rust crate called adb_client which has been open-sourced on our GitHub and also available on crates.io. This crate provides a high-level interface to interact either directly with a running ADB server (and therefore provides a direct replacement for adb client), or directly with an Android device connected via USB or available over TCP, thus removing the need for an intermediate server. As a result, it can be used in automation scripts from Rust code involving Android devices. Rust language was chosen for its safety features and the ability to bridge into various other languages with its bindings (like pyo3 for Python and extern "c" to call functions from C code…).
Even though Mozilla has already a work-in-progress on such a crate called mozdevice1, it lacks many commands and functionalities, and features seems more driven by their internal needs.
Thus, adb_client was created, filling this gap by providing a more feature-rich and expandable solution.
Some ADB basis to begin
ADB (Android Debug Bridge) is a debugging toolset provided by Google, introduced in 2008 alongside the first version of Android, Android 1.0. While crucial for Android development and debugging, ADB is not directly included within the AOSP (Android Open Source Project). Instead, it is part of the Android SDK (Software Development Kit). Project is well-maintained and its full code is also open-source and available at android.googlesource.com.
ADB’s primary purpose is to facilitate communication between an Android device and a development machine. It includes three components, primarily written in C++:
- A client: Installed on host computer, it interacts with the server. Both binaries are the same, the server is just
fork()andexecve()on demand by the client, spawning it withfork-server serveras arguments in argv. - A server (called
host): Also installed on host computer, its main roles are to multiplex connections to “devices” (which can be either physical or virtual) and to abstract the transport layer (that can be either USB or TCP). - A daemon (called
adbd): Located on Android devices within the “system” partition, it runs a main loop waiting for connections, and process them to spawn services (like framebuffer, JDWP (Java Debug Wired Protocol)…), send or receive files, execute commands… Its source code is located underadb/daemonfolder.
As mentioned, client and server share much of the same code. However, some code is also shared with adbd and is conditionally included using compiler directives. ADB_HOST directive marks code relevant to both client and server, while __ANDROID__ identifies specific portion of code related to adbd daemon.
From a security perspective, a host cannot communicate with a device unless it has been explicitly authorized. For a connection to be established, the USB debugging feature must be enabled in the Developer options settings (hidden panel accessible by clicking five times on “Build number”). When a host connects to a device for the first time, a confirmation popup appears on this device prompting the user to approve the connection by validating a RSA key fingerprint. A quick look at ADB source code reveals that the host uses a RSA 2048 private key, stored by default in $(HOME)/.android/adbkey. When a new host is authorized on a device, its public key fingerprint is saved in /data/misc/adb/adb_keys (writable only by “system” user) or /adb_keys (helping provisioning for vendors and not available on production devices). This setup prevents repeated user prompts during each connection and allows devices to be provisioned with pre-approved public keys.
This authentication process occurs exclusively between adb-server and adbd. However, to bypass the server and interact directly with a client, as will be discussed in a next blogpost, understanding how this authentication process really works under the hood will be required.
ADB protocol overview
With the fundamental concepts and these three major components introduced, we can now focus on the underlying protocol used for communication between all these entities. A detailed and clear overview of the interactions taking place between these components is provided by Google in the README.md2 file of the ADB repository.
+----------+              +------------------------+
|   ADB    +----------+   |      ADB SERVER        |                   +----------+
|  CLIENT  |          |   |                        |              (USB)|   ADBD   |
+----------+          |   |                     Transport+-------------+ (DEVICE) |
                      |   |                        |                   +----------+
+-----------          |   |                        |
|   ADB    |          v   +                        |                   +----------+
|  CLIENT  +--------->SmartSocket                  |           (TCP/IP)|   ADBD   |
+----------+          ^   | (TCP/IP)            Transport+-------------+ (DEVICE) |
                      |   |                        |                   +----------+
+----------+          |   |                        |
|  DDMLIB  |          |   |                     Transport+--+          +----------+
|  CLIENT  +----------+   |                        |        |  (TCP/IP)|   ADBD   |
+----------+              +------------------------+        +----------|(EMULATOR)|
                                                                       +----------+
We can clearly see that the protocol is divided into two distinct parts :
- On the left side, ADB <-> ADB Server: relies only on a "smart" protocol (basically meaning a protocol over TCP/IP), no matter what client is used (
adb“official” client, ddmlib (Dalvik Debug Monitor Library) or other third-party clients) - On the right side, ADB Server <-> ADB Devices is quite different: connection operates differently, with transport methods varying based on the type of device. Physical devices can connect either via USB or TCP/IP (typically for devices on the same local or remote network), while emulators are only reachable over TCP/IP. Underlying smart protocol differs from the previous one, and the connection between the server and physical devices is even secured within an encrypted channel.
Because each side uses its own protocol, Google logically chose to implement an intermediate server capable of understanding both, and bridging between these two worlds.
ADB Client <-> ADB Server
ADB server listens by default on 127.0.0.1:5037/tcp (though this can be adjusted as needed) and implements a relatively straightforward smart protocol.
This protocol is similar to a LTV (Length Type Value): A request begins with four hexadecimal bytes indicating the length of the data, followed by the textual representation of the desired service, and then any optional data, data depending on the specific service being requested (examples provided later). Google chose to send textual representation of commands rather than something smaller like enums because this protocol was designed for easy debugging from a network perspective.
In the context of ADB, a service refers to a specific command or operation that the client requests the server to execute. These services can range from simple tasks like querying the server’s status to more complex operations that involve communication with an Android device like command execution, file(s) download / upload, device logs streaming … An exhaustive list of all possible service requests, along with their respective usages, can be found in the repository’s SERVICES.md file3.
host and local services
We will now focus on the two main types of services a client can request: host services are handled directly by the server, without needing to query or involve devices for additional information. In contrast, local services are tied to a specific device and are forwarded by the server to an Android device adbd daemon for processing.
Examples of host requests:
| Request body | Equivalent ADB command | Explanation |
|---|---|---|
host:version |
adb version |
Ask the server for its internal version |
host:devices |
adb devices |
Ask the server to list available devices (that can be either local, remote or emulators) |
host:kill |
adb kill-server |
Kill the server if running |
Examples of local requests:
| Request body | Equivalent ADB command | Explanation |
|---|---|---|
shell:{command arg1 arg2} |
adb shell {command arg1 arg2} |
Execute the given shell command (empty command spawns an interactive shell) |
reboot:{type} |
adb reboot {type} |
Reboot selected device in bootloader|recovery|sideload|sideload-auto-reboot (empty means system) |
One advantage of writing our own ADB client is that it allows us to access services that are not publicly exposed in the official ADB CLI.
For example, the framebuffer service, which enables dumping the device’s framebuffer to take a screenshot, is well-documented in the SERVICES.md file but is inaccessible via the standard ADB interface but available on devices adbd.
framebuffer:
    This service is used to send snapshots of the framebuffer to a client.
    It requires sufficient privileges but works as follow:

      After the OKAY, the service sends 16-byte binary structure
      containing the following fields (little-endian format):

            depth:   uint32_t:    framebuffer depth
            size:    uint32_t:    framebuffer size in bytes
            width:   uint32_t:    framebuffer width in pixels
            height:  uint32_t:    framebuffer height in pixels

      With the current implementation, depth is always 16, and
      size is always width*height*2

      Then, each time the client wants a snapshot, it should send
      one byte through the channel, which will trigger the service
      to send it 'size' bytes of framebuffer data.

      If the adbd daemon doesn't have sufficient privileges to open
      the framebuffer device, the connection is simply closed immediately.
Implementing this command on a custom client speeds up the screenshot process compared to using the classic adb exec-out screencap -p > screen.png command.
Network interactions
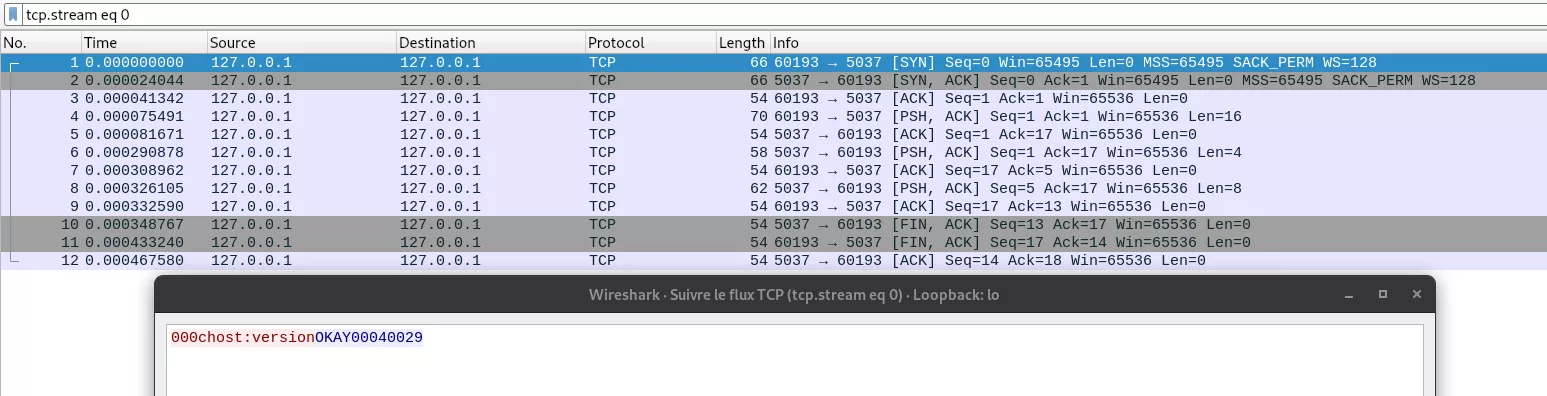
The following figure illustrates the interaction between adb and adb-server (host) when running the adb devices command, as well as the output that results from sending an unknown command (incorrect command would result in the same output):

- The client opens a TCP connection to the server and requests its version to ensure compatibility.
- Request is acknowledged by the server with an OKAY response.
- And the server sends its version information back to the client and closes the TCP connection.
- Client opens a new TCP connection and asks the server to list all available devices.
- Request is acknowledged.
- Server responds with a structured object (in the example this is just the device identifier and the device state “device” separated by a space like in
adb devicesoutput), and finally closes this connection. - Sending an unknown command makes server responding FAIL and a contextual message explaining the reason.
Network capture tools like wireshark or tcpdump are very useful for understanding how this part of the protocol works as it is quite simple. However one limitation of this method is that wireshark can currently only dissect network packets for ADB Client -> Server interactions when adb version is prior to 1.0.31. Despite this, an overview of the protocol can still be obtained by examining the raw TCP data directly.
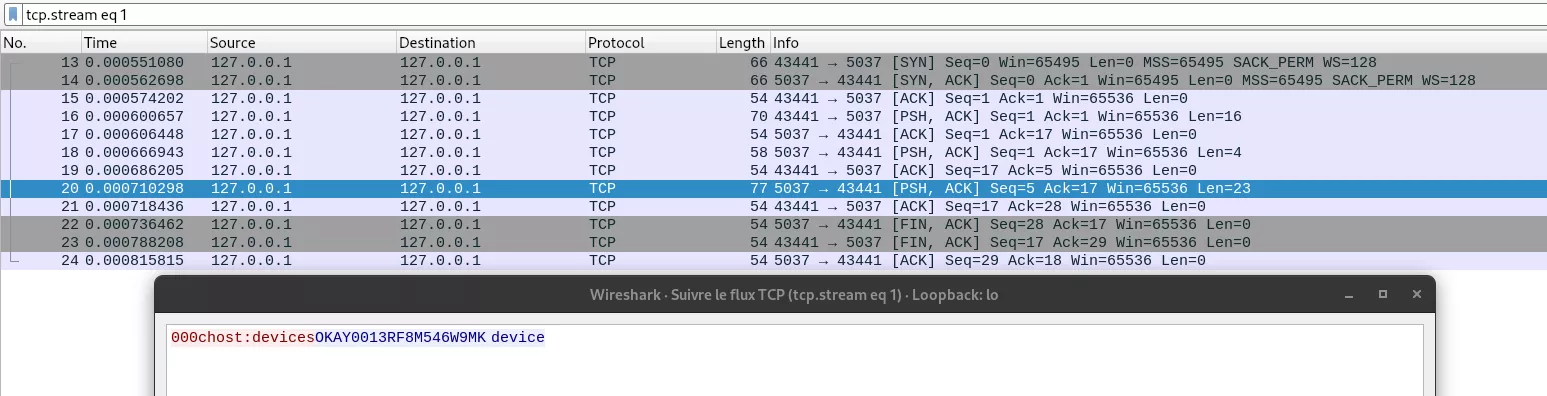
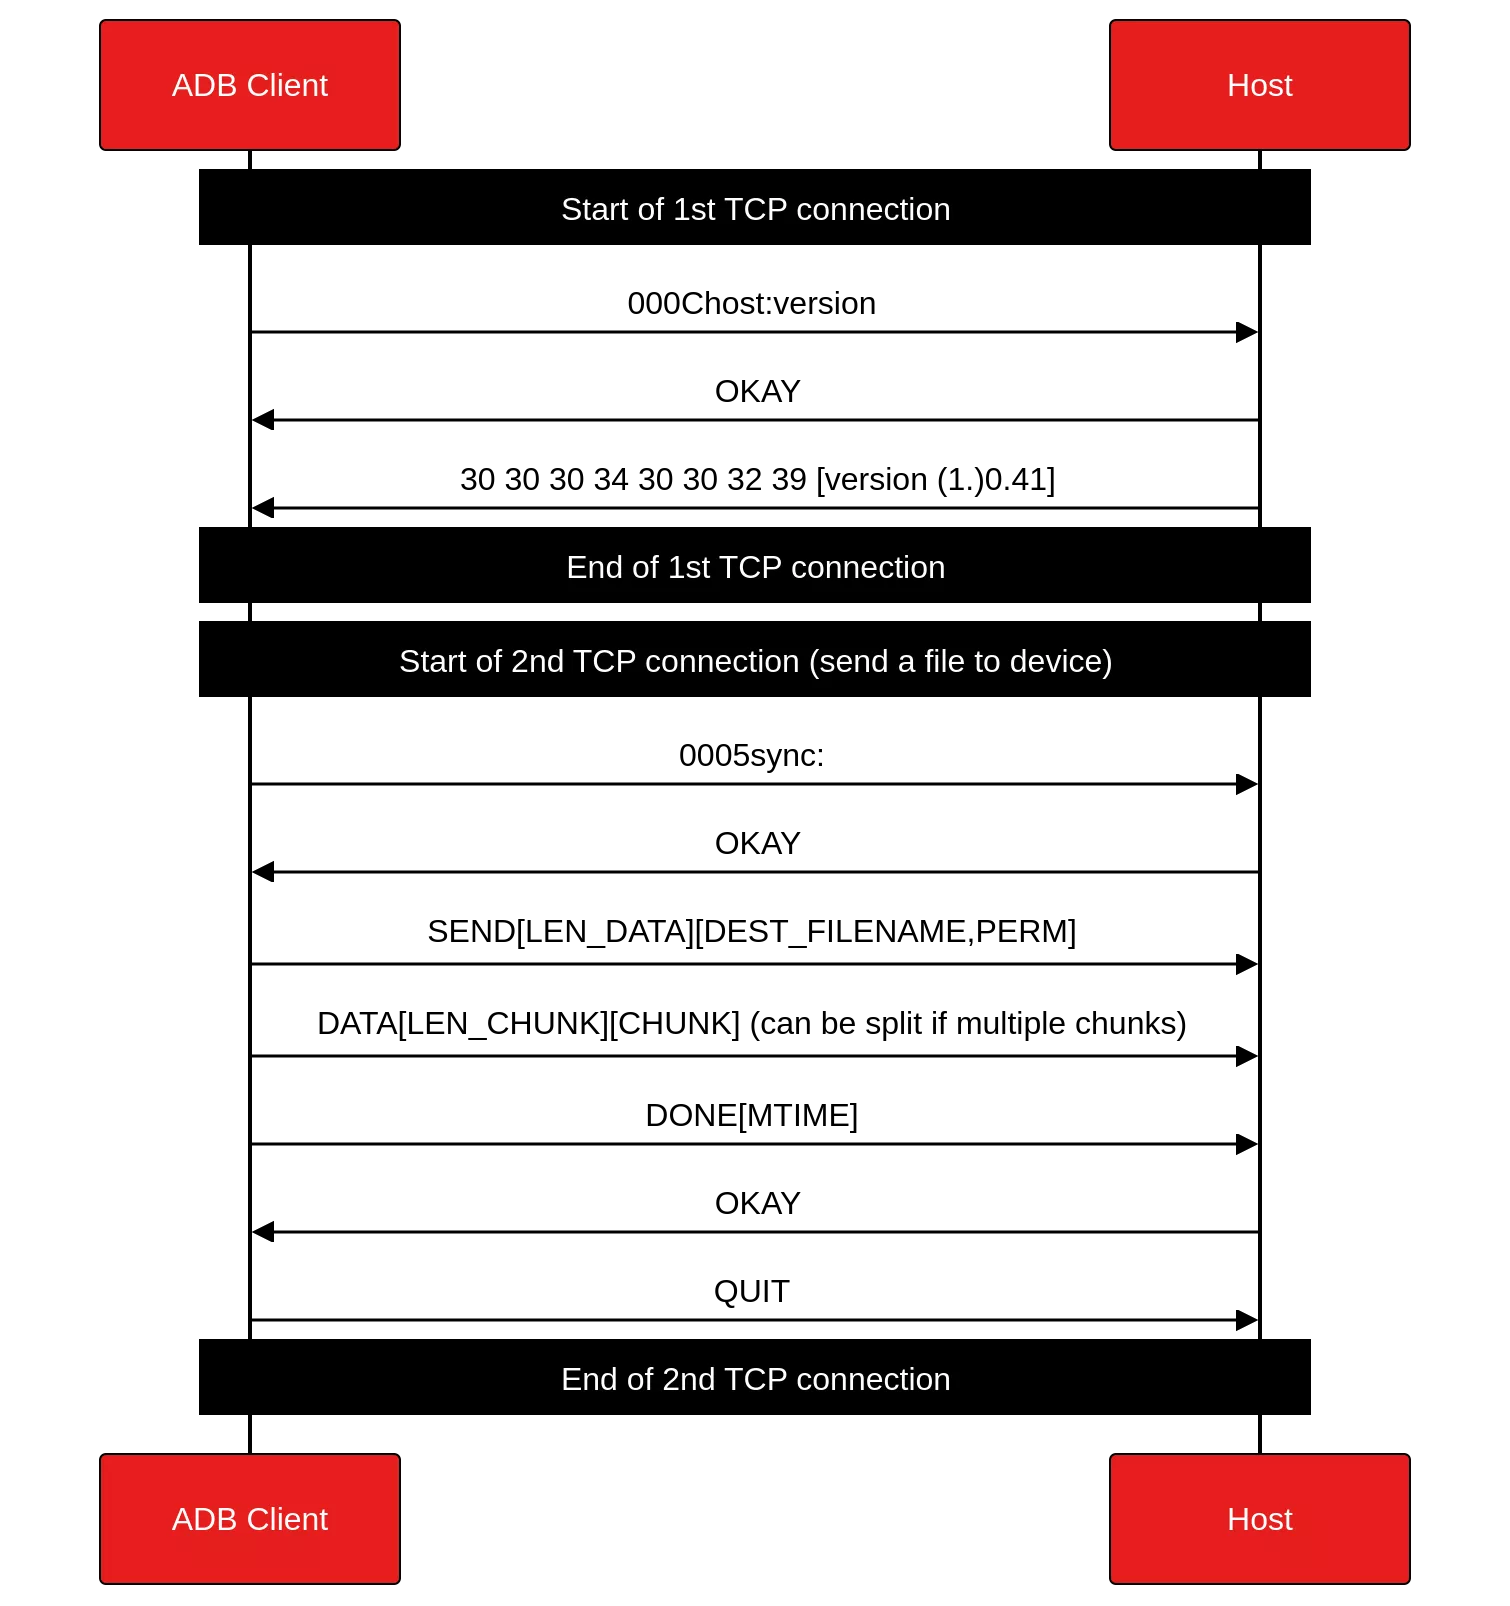
sync requests
The sync command is a special type of request in the ADB protocol that encompasses four underlying operations: LIST, RECV, SEND, and STAT. These operations are primarily used for dealing with files on the device’s filesystem.
In sync mode, the protocol structure remains consistent with the previous interactions but requires a specific initiation process. To enter this mode, connection must first be established with a sync: command. It signals that subsequent interactions will be related to file synchronization tasks.
- LIST: list the contents of a directory on the device.
- RECV: download a file from the device to the client.
- SEND: upload a file from the client to the device.
- STAT: get file or directory information on the device.
Next figure illustrates network interactions when executing the adb push input dest command (in a generic way, omitting dest filename):
Library implementation
The previous section covered the theoretical aspects of the ADB protocol. Now, we’ll shift our focus to the practical implementation through a Rust library. Instead of diving into the code in details, which would not bring much advantages, we will rather focus on a the high-level logic and design.
This library has been designed to abstract away as much as possible the underlying protocol logic. Two main structures drive this code :
ADBServer: handling all server-specific logic (meaninghostcommands).ADBServerDevice, which can then be obtained by querying this server for a specific identifier (identifier existence is checked here). Afterwards all commands methods can then be executed directly on this device (meaninglocalcommands).
let mut server = ADBServer::default();

// Query the server for a device given its identifier
let mut device: ADBServerDevice = server.get_device_by_name("7a4a58ab051227201")?;

// Finally execute one (or more) command(s) on this device
device.shell_command(["id"], std::io::stdout())?;

// Upload a file on device
let mut binary = File::open("./binary")?;
device.send(&mut binary, "/data/local/tmp/binary")?;

// Spawn an interactive shell on device
device.shell()?;
The library has been designed with extensibility in mind, and all currently supported services are encapsulated in an internal enum. This enum is not exposed to the public API, which ensures that the API remains as clear and explicit as possible, with user-facing methods such as .get_version(), .shell(), .framebuffer(), etc.
pub(crate) enum AdbServerCommand {
    // Host commands
    Version,
    Kill,
    Devices,
    DevicesLong,
    TrackDevices,
    HostFeatures,
    Connect(SocketAddrV4),
    Disconnect(SocketAddrV4),
    Pair(SocketAddrV4, u32),
    TransportAny,
    TransportSerial(String),
    // Local commands
    ShellCommand(String),
    Shell,
    FrameBuffer,
    Sync,
    Reboot(RebootType),
}
Given that these enum variants correspond directly to underlying protocol commands, it was intuitive to implement the well-known std::fmt::Display trait. This allows each command to be formatted as its respective protocol string, ensuring that they are both human-readable and correctly structured for use in communication with the server. Moreover, Rust’s strict type system enforces this extensibility by requiring that any new variant added to the AdbServerCommand enum must also have its corresponding implementation of the trait. This ensures that all commands are consistently formatted and makes the codebase more robust and future-proof.
impl Display for AdbServerCommand {
    fn fmt(&self, f: &mut std::fmt::Formatter<'_>) -> std::fmt::Result {
        match self {
            AdbServerCommand::Version => write!(f, "host:version"),
            AdbServerCommand::Kill => write!(f, "host:kill"),
            AdbServerCommand::Devices => write!(f, "host:devices"),
            AdbServerCommand::DevicesLong => write!(f, "host:devices-l"),
            AdbServerCommand::Sync => write!(f, "sync:"),
            AdbServerCommand::TrackDevices => write!(f, "host:track-devices"),
            AdbServerCommand::TransportAny => write!(f, "host:transport-any"),
            AdbServerCommand::TransportSerial(serial) => write!(f, "host:transport:{serial}"),
            AdbServerCommand::ShellCommand(command) => match std::env::var("TERM") {
                Ok(term) => write!(f, "shell,TERM={term},raw:{command}"),
                Err(_) => write!(f, "shell,raw:{command}"),
            },
            AdbServerCommand::Shell => match std::env::var("TERM") {
                Ok(term) => write!(f, "shell,TERM={term},raw:"),
                Err(_) => write!(f, "shell,raw:"),
            },
            AdbServerCommand::HostFeatures => write!(f, "host:features"),
            AdbServerCommand::Reboot(reboot_type) => {
                write!(f, "reboot:{reboot_type}")
            }
            AdbServerCommand::Connect(addr) => write!(f, "host:connect:{}", addr),
            AdbServerCommand::Disconnect(addr) => write!(f, "host:disconnect:{}", addr),
            AdbServerCommand::Pair(addr, code) => {
                write!(f, "host:pair:{code}:{}", addr)
            }
            AdbServerCommand::FrameBuffer => write!(f, "framebuffer:"),
        }
    }
}
A binary is also exported within this project to give a built-in replacement of adb CLI. This binary uses and wraps adb_client library to provide an interface as the official binary would do, adding special commands (like framebuffer we saw beforehands). It can be installed using Rust’s official repository and cargo install adb_cli command.
user@laptop ~> adb_cli --help
Rust ADB (Android Debug Bridge) CLI

Usage: adb_cli [OPTIONS] <COMMAND>

Commands:
  host-features  List available server features
  push           Push a file on device
  pull           Pull a file from device
  list           List a directory on device
  stat           Stat a file specified on device
  shell          Spawn an interactive shell or run a list of commands on the device
  reboot         Reboot the device
  framebuffer    Get framebuffer of device
  logcat         Get logs of device
  kill           Ask ADB server to quit immediately
  devices        List connected devices
  track-devices  Track new devices showing up
  pair           Pair device with a given code
  connect        Connect device over WI-FI
  disconnect     Disconnect device over WI-FI
  sms            Send a SMS with given phone number and given content
  rotate         Rotate device screen from 90°
  help           Print this message or the help of the given subcommand(s)

Options:
  -a, --address <ADDRESS>  [default: 127.0.0.1:5037]
  -s, --serial <SERIAL>    Serial id of a specific device. Every request will be sent to this device
  -h, --help               Print help
  -V, --version            Print version
Security considerations
Using ADB client -> server protocol introduces several security risks that must be taken in consideration in your risk analysis:
- TCP data in ADB communication is not encrypted, which means sensitive information can be intercepted, especially when using ADB over a LAN.
- Once a device has been paired, no further authentication is required, leaving it vulnerable to unauthorized access if someone can interact with the server.
- In cases of improper network configuration (or even intentionally), the ADB server port, which listens on 127.0.0.1 by default, could be exposed on Internet. This could make devices paired with a server accessible from anywhere in the world, meaning devices being world-reachable. (shodan.io indexes lots of available devices…)
- CVEs may (and have been) discovered on ADB…
Conclusion
This first article led us to start exploration of the wonderful world opened by the ADB protocol, but we’re only halfway there. We have managed to get rid of the first adb client dependency, but the adb-server is still required at the time. In the next blogpost we will improve this version of adb_client Rust crate to connect directly to an end device without having to involve the server, talk about how client authentication process is handled by adbd and we’ll discuss about how all these mechanism can be tested.
- 1. mozdevice crate: https://docs.rs/mozdevice/latest/mozdevice
- 2. ADB documentation by Google: README.md
- 3. List of all available services: SERVICES.md