Forensic analysis of bitwarden self-hosted server
Bitwarden is a popular password managing software. Being open-source, it offers self-hosting capabilities with ease of use in a controlled office or home environment. Attackers might prioritize targeting this application given the secrets it usually stores. In this article, we will deep dive into the internals of Bitwarden, how it stores encrypted data, and what information is available to whomever controls the server.
Vous souhaitez améliorer vos compétences ? Découvrez nos sessions de formation ! En savoir plus
Introduction
Bitwarden is a popular password managing software. It offers features such as synchronization across multiple devices, password sharing, SSO Login, RBAC, directory sync, a web application, an extension, mobile apps, CLI, event logs, etc. These features are usually available with any mainstream password manager, but Bitwarden differs in the fact that the code is open-source. Even if other popular password manager software are open-source, the likes of KeePass for example, they do not natively include synchronization features across multiple devices.
Furthermore, users can self-host their Bitwarden server to deploy a centralized password manager within their organization or for home use.
A few months ago, one of Synacktiv's CSIRT client was compromised and their self-hosted Bitwarden instance was breached. They started receiving emails stating that an admin account was trying to log in and asked us to investigate. During the attack, the threat actor gained access to the Linux server on which the Bitwarden application was installed.
Frequently, these password managers are analyzed from an attacker point of view trying to break the encryption or dump memory to recover passwords. In this article, we will focus on analyzing forensic data from a Bitwarden self-hosted instance, based on the assumption that the server underneath is breached. We will explore the information that a threat actor with high privileges and access to Bitwarden installation databases can find. Then we will take a look at and enumerate interesting Bitwarden logs to help blue team members track Bitwarden malicious activity.
The version used for this article is Bitwarden 2024.7.4 published August 12, 2024.
Bitwarden overview
Bitwarden is a “zero knowledge” password manager. This means that the Bitwarden server never knows what the plain text master password is. All the encryption is done on the client's side. The Bitwarden server is simply a storage solution that stores encrypted data.
In their documentation, they state that “Your data remains encrypted end-to-end with your individual email and Master Password.”, but what exactly is data ?
In Bitwarden, you can store several kinds of personal information. Obviously, you store username-passwords combinations, but you can store identities and credit cards as well. This information is either strictly linked to the account, or shared within an organization. There is, at the time of writing, no way to share items directly between accounts.
The Bitwarden encryption schema is fairly complex, here is an overview of what happens when a new user registers to the server:
- The user enters an email as username and a master password. The master password is the main way of accessing the vault. It must not be lost or written anywhere else.
- The master password is then derivated using the PBKDF2 key derivation function with the email address as salt. Bitwarden uses 600 000 iterations of this function to stretch the master password. The result of this operation is a 256-bits master key.
- This master key is then stretched even further using HKDF to obtain a 512-bits stretched master key.
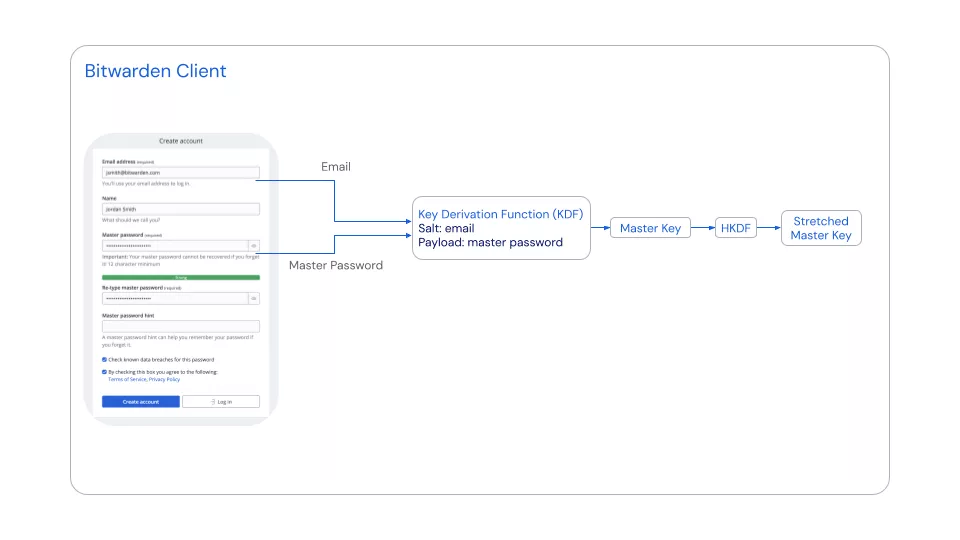
These keys are never stored on the Bitwarden server. These steps are computed directly on the client (web app, android application, browser extension, etc.).
Next:
- A 512-bits generated symmetric key and a 128-bits Initialization Vector (IV) are created using CSPRNG.
- This 512-bits symmetric key is encrypted using AES-256 and the 512-bits stretched master key as key and the previously generated initialization vector as IV. The result is called the protected symmetric key and is the main key associated with the user.
- The protected symmetric key is sent to the server.
Finally, to handle the authentication:
- A master password hash is generated. It uses PBKDF-SHA256, the master key as payload and reuses the master password as salt.
- This hash is sent to the server to be compared to during authentication.
- Upon reaching the server, it is rehashed using PBKDF2-SHA256 with a random salt and 600,000 iterations.
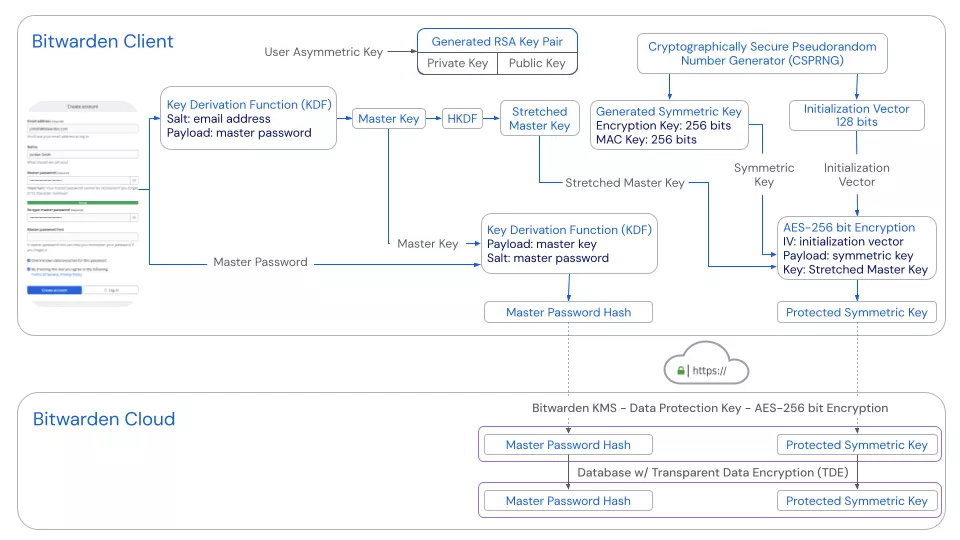
Additionally, an asymmetric RSA key pair is created to be used when creating an organization and during emergency access recovery.
When a user tries authenticating against the server and enters his master password, the steps below are computed once again:
- The master password is derivated using PBKDF2 and the email as salt, this produces is a 256-bits master key.
- A master password hash is generated. It uses PBKDF-SHA256, the 256-bits master key as payload and reuses the master password as salt.
- The hash is sent to the server to be compared with what is stored server side. If both hashes match, the user is authenticated.
This step only allows the user to gain access to his account on the server, at this point, his vault remains encrypted and data is still inaccessible. All functions associated with data inside the vault will be restricted such as: view, edit, list, etc.
To decrypt the vault, the following additional steps are required:
- The master key is necessary once again and expended to the stretched master key.
- The server-side stored protected symmetric key is retrieved by the client and decrypted using the stretched master key to produce the symmetric key.
- Finally, the symmetric key is used to decrypt the locally saved vault.

Bitwarden maintains an interactive simulation page where a user can explore every key derivation steps: https://bitwarden.com/crypto.html.
Database analysis
Now that we know the server never stores personal vault information in clear text in its database, let's find what data a bad actor with access to the database could obtain.
Bitwarden's storage structure uses an MSSQL database to store all information relative to the current installation.
When a user installs Bitwarden on a Linux host using Docker, the preferred installation method, the database is located at ./bwdata/mssql/data/.
To prevent data loss, Bitwarden automatically backs up the complete vault database to a file located in ./bwdata/mssql/backups/. According to Linux file utility, these backups are vault_FULL_20240821_000000.BAK: Windows NTbackup archive NT, with file catalog, soft size 8*512, software (0x1200): Microsoft SQL Server files.
For a medium size organization of about 180 employees, this backup file was about 200 MB. Size being reasonable, it is susceptible to leak easily even in environment where data volume is monitored.
It is possible to restore the backup. After opening the database backup file using Microsoft SQL Management Studio v19.0.2 on Windows, it contains the following tables:
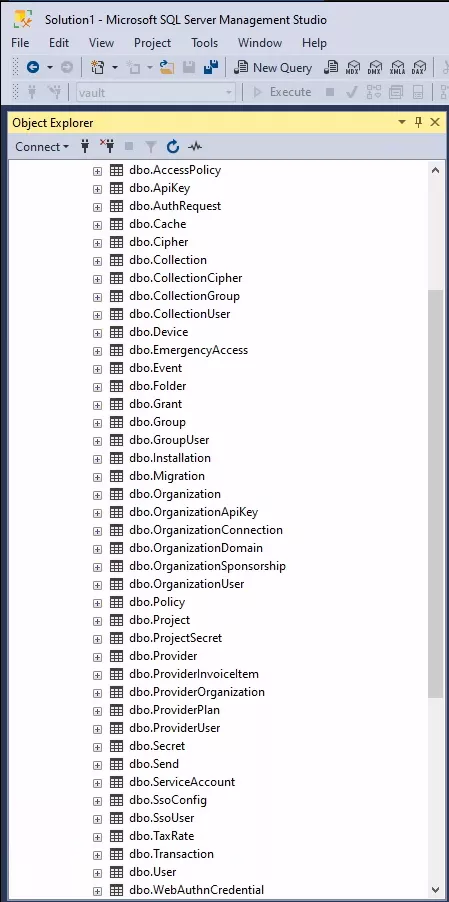
Here, the tables of interest for an attacker are dbo.Cipher, dbo.Organization, dbo.Device and dbo.User. These tables contain encrypted and plain text data that could be relevant for an attacker and during an investigation. This article will focus on these tables only.
Users
Let's take a look at dbo.User. This table contains all data relative to accounts registered on the server. The most relevant columns for this table are:
| Column | Encrypted | Comments |
|---|---|---|
| ID | No | Server side account ID |
| Name | No | Name selected during registration, can be null |
| No | User email | |
| EmailVerified | No | Is the email verified, users are invited to verify their accounts upon registration, this is not mandatory |
| MasterPassword | No | Master password hash |
| MasterPasswordHint | No | Hint selected during registration, if the user forgets his password, the hint is sent via email, can be null |
| TwoFactorProviders | No | The 2FA method selected, can contain the email to receive codes on or the authenticator key, can be null if the account does not have 2FA enabled! |
| TwoFactorRecoveryCode | No | If the user lost his 2FA authentication method, he can recover access to his account using his master password and this recovery code |
| Key | Yes | Protected symmetric key |
| PublicKey | No | Used for the emergency access feature |
| PrivateKey | Yes | Used for the emergency access feature |
| CreationDate | No | Account creation date |
| ApiKey | No | When using automated workflow, it is possible to replace the master password to authenticate against the server, this solely does not unlock the vault |
| ForcePasswordReset | No | Will the user need to reset his password upon connection |
| FailedLoginCount | No | Number of failed authentication attempts |
| LastFailedLoginDate | No | Date of last failed authentication attempt. |
For example, if you remember from the previous chapter where we discussed the encryption mechanisms, the user emails are never encrypted. This is the same for first name and last name, as well as the master password hint. This makes sense since only the email is required to ask the server for the master password hint. The master password hint being received by email.
This information does not give direct access to the account and to the vault, but this is a clear leak of personal and company data. Such data could be used to pivot to other accounts or glean additional information.
The Bitwarden clients forbid usage of the same value for master password and master password hint. But a user could precisely point to a value that would help the attacker find the actual password. For example, imagine that user John Doe, with email <john.doe@gmail.com>, used the password hint “same as Netflix”. This in itself does not give the actual master password to the attacker, but a quick research online shows that this particular Netflix email and its corresponding password combination was leaked a few months prior. In that case, the attacker could pivot off this master password hint to recover the master password. During the real investigation, this behavior was noticed in about 30% of all the master password hints, showing that it can totally happen and may not be isolated behavior.
Furthermore, if the attacker gets access to this table, where the master password hash is registered, he could try to crack it offline. The hash is built upon the master key, a 256 bits key obtained from a first round of PBKDF2 with 600000 iterations, based on the master password and the email. The iteration value is way above the default value of 1000. On a consumer grade laptop, computing one hash takes about 1.15 seconds on average. Bruteforcing a strong master password would need a colossal amount of performance and time, even knowing the email.
The ID is used throughout the tables, it is used everywhere a user needs to be referenced.
The columns TwoFactorProviders and TwoFactorRecoveryCode are interesting because it allows an attacker that has the master password but no access to either the mailbox or the authenticator app to successfully authenticate, essentially bypassing 2FA. Usefulness is limited due to using the master password being a requirement, but an attacker with enough knowledge could have access to the vault.
The API key entry is where the API keys for users are stored. This value is not encrypted, and the user can retrieve his by simply going to the keys menu in his account settings. This key is used to authenticate to the server when the workflow requires automation. The official Bitwarden CLI client “bw”, features the following commands:
Commands:
  login [options] [email] [password]          Log into a user account.
  logout                                      Log out of the current user account.
  lock                                        Lock the vault and destroy active session keys.
  unlock [options] [password]                 Unlock the vault and return a new session key.
  sync [options]                              Pull the latest vault data from server.
  generate [options]                          Generate a password/passphrase.
  encode                                      Base 64 encode stdin.
  config [options] <setting> [value]          Configure CLI settings.
  update                                      Check for updates.
  completion [options]                        Generate shell completions.
  status                                      Show server, last sync, user information, and vault status.
  list [options] <object>                     List an array of objects from the vault.
  get [options] <object> <id>                 Get an object from the vault.
  create [options] <object> [encodedJson]     Create an object in the vault.
  edit [options] <object> <id> [encodedJson]  Edit an object from the vault.
  delete [options] <object> <id>              Delete an object from the vault.
  restore <object> <id>                       Restores an object from the trash.
  move <id> <organizationId> [encodedJson]    Move an item to an organization.
  confirm [options] <object> <id>             Confirm an object to the organization.
  import [options] [format] [input]           Import vault data from a file.
  export [options]                            Export vault data to a CSV or JSON file.
  share <id> <organizationId> [encodedJson]   --DEPRECATED-- Move an item to an organization.
  send [options] <data>                       Work with Bitwarden sends. A Send can be quickly created using this command or subcommands can be used to fine-tune the Send
  receive [options] <url>                     Access a Bitwarden Send from a url
  device-approval                             Manage device approval requests sent to organizations that use SSO with trusted devices.
  serve [options]                             Start a RESTful API webserver.
  help [command]                              display help for command
Once logged in, of all these commands, only sync, generate, encode, config, update, completion, and status work without having to enter the master password. In summary, every vault data manipulation or access requires the master password. This makes sense since the server never knows by itself how to decrypt the data.
From a forensic investigator point of view, this table gives a few clues.
- First, the absence of 2FA could point to a target of interest for the attacker.
- Second, during the investigation, the attacker tried to create an account. The account creation date is registered here and could be used to estimate the breach timeframe.
- Third, the
FailedLoginCountandLastFailedLoginDate. These could indicate a brute force attempt on one or multiple accounts across the entire server, with the last failed attempt giving once again an estimate timeframe. Bitwarden documentation states that the maximum number of failed authentication is limited to 9 coming from an untrusted device, before having to solve a CAPTCHA is required. This potentially slows down the attack, but this mitigation is not bulletproof.
Ciphers
Every piece of data stored by the server is called a Cipher. The cipher table stores all the registered ciphers for all users and organizations.
For each cipher, an ID is generated and associated with either the userID or the OrganizationID. The entry is then registered in the data column as a JSON:
{
    "Uris": [
        {
            "Uri": "2.xLTTztrZzXVEeQMDzj8/XA==|RAAErMxtX6FcSkDtUNVsIMDqScWn3F3bwtCcygbcMO8=|wbi+s0foVfcF34/v0gLgNdoUBHFPq9cAQP1sop1gzVY=",
            "UriChecksum": "2.KKuPgVfJMyglfhRL9q0tGQ==|ygN9yDqOweGiHpB2QJmGrE3ja6iUU7pLdw6sB9nLYC20udSUmAXq2SSgBAdQGwKy|xSeVY+YEKv+y9s8jGK4Ys1Z58y+P9GNrwXPQ4ZzgLCE="
        }
    ],
    "Username": "2.YkNHoztsIt2oI7P+0CbCjQ==|OMsgaC82pwDhrZCoym5yXQ==|QpYQx22iARzYT4k64d9+4LXv7hCDVR4gldxFZ3Z3ukk=",
    "Password": "2.zc/+9T96PS4kP0/7FsPULg==|tnC+SZXKdGrcYspSFijg9A==|vatjEgFBJrtrEII7WZvSRBhML6/AjGHgmwgvT+MEhGQ=",
    "Name": "2.4/YVEFhTa0d66ScCIZ69+A==|M+Odctlh7z/fekd6F3uCVA==|6f8gcDS8SPaXfhzxMOsvhXZIrOcpuHeoWok8ZrIHFA0=",
    "Notes": "2.xEMDu3mtIZxG7ymCeOTCog==|s8BKuaJuEnSmUD73JHSA6g==|F6/eGPNShhTQNu5DDR6bN7ROqY6YKSVAOEyhAzB9tYk=",
    "Fields": [
        {
            "Type": 0,
            "Name": "2.nUWFRBJYisabyEDtev1pvA==|fLmo1rvkkmlFXVyBh8+OCHxo9bB7ukC9/R/aPcKJuq4=|Sm7m4YV5fPnhnrrBkDtDYHV3+bU8efVIY+IrL4gHwBE=",
            "Value": "2.rrSFrP5NzdGjIK32svbN9Q==|iSd2mzdrS4JjeMESE/rIPt9v0BFBwnzbyjKhSjBtiXc=|dKCqpSrSdCy2BqFbm0SRxw+hZ5F17fSakiHrm414JG8="
        },
        {
            "Type": 2,
            "Name": "2.z2aLC644xMULIbAXJhPvyA==|nLgXICcP4WHDsXofulSL83s3daI5MQ6796H71U2UvSM=|JcKGZuJZlG+BKXLvxNiC1YhtiEDGIfuJYhmI7y5yU2U=",
            "Value": "2.rgEKh1y4kRbpI4o3LPe5Tg==|LCtcrkd/dfMORR/q0UjsUQ==|k0cXzGCwcFEjDQGNG5fPElKrPmfsoF2lzGGt9vPA50g="
        }
    ]
}
As you can see, all the relevant information is encrypted, an attacker can only map users or organizations with their respecting ciphers, but that is not very useful. An attacker could maybe find users with the most ciphers attached to them and try to focus them more, but this is pure speculation at this point.
Organizations
When a corporate Bitwarden server is compromised, it is very likely that there will be a configured organization within it.
A Bitwarden organization is an entity that can store folders and entries with the goal of sharing these entries among colleagues. Each member can be part of organization groups to restrict access to entries. Enabling organization functionalities require a premium plan and a license, even for a few users.
The dbo.Organization table stores encrypted keys related to the organization. Having access to that table however gives access to private corporate information such as:
- the billing email related to the organization, a target for scamming attempts or business email compromise
- the license key used by the organization
Devices
Finally, the dbo.Device table handles information about used devices across the entire user base. This table is both interesting for attackers and forensics analysts since it contains all users habits and connection means.
The table contains the following relevant columns:
| Column | Comments |
|---|---|
| ID | ID of the registered device |
| UserId | User ID that used this device |
| Name | Name of the device type used the by the user |
| Type | Type number of the device used by the user |
| Identifier | Unique identifier |
| PushToken | Token used to send notifications to the device |
| CreationDate | Device enrollment date |
In Bitwarden server source code, this enumeration lists all the possible device types:
public enum DeviceType : byte
{
    [Display(Name = "Android")]
    Android = 0,
    [Display(Name = "iOS")]
    iOS = 1,
    [Display(Name = "Chrome Extension")]
    ChromeExtension = 2,
    [Display(Name = "Firefox Extension")]
    FirefoxExtension = 3,
    [Display(Name = "Opera Extension")]
    OperaExtension = 4,
    [Display(Name = "Edge Extension")]
    EdgeExtension = 5,
    [Display(Name = "Windows")]
    WindowsDesktop = 6,
    [Display(Name = "macOS")]
    MacOsDesktop = 7,
    [Display(Name = "Linux")]
    LinuxDesktop = 8,
    [Display(Name = "Chrome")]
    ChromeBrowser = 9,
    [Display(Name = "Firefox")]
    FirefoxBrowser = 10,
    [Display(Name = "Opera")]
    OperaBrowser = 11,
    [Display(Name = "Edge")]
    EdgeBrowser = 12,
    [Display(Name = "Internet Explorer")]
    IEBrowser = 13,
    [Display(Name = "Unknown Browser")]
    UnknownBrowser = 14,
    [Display(Name = "Android")]
    AndroidAmazon = 15,
    [Display(Name = "UWP")]
    UWP = 16,
    [Display(Name = "Safari")]
    SafariBrowser = 17,
    [Display(Name = "Vivaldi")]
    VivaldiBrowser = 18,
    [Display(Name = "Vivaldi Extension")]
    VivaldiExtension = 19,
    [Display(Name = "Safari Extension")]
    SafariExtension = 20,
    [Display(Name = "SDK")]
    SDK = 21,
    [Display(Name = "Server")]
    Server = 22,
    [Display(Name = "Windows CLI")]
    WindowsCLI = 23,
    [Display(Name = "MacOs CLI")]
    MacOsCLI = 24,
    [Display(Name = "Linux CLI")]
    LinuxCLI = 25
}
Finding evil behavior in this table would be trying to identify discrepancies between the usual user behavior and the recent activity. Maybe a new device was added, for example a new iPhone device appears recently in the table even though the user only has an Android device, etc.
Events and Logs
Events
During a forensic investigation, the analyst's goal is trying to identify as much evil activity as possible, and to establish a timeline when possible. In an ideal world, the timeline would start the moment the attacker breached in and would end when the attacker is pushed away from the corporate network. The timeline helps in establishing a clear picture of attacker activity.
To achieve this goal, investigators rely heavily on applications logs or registered events. This data is usually timestamped and provides details of the attacker methods and goals.
Bitwarden server registers user events, items events, collection, groups, and organization events. The documentation (https://bitwarden.com/help/event-logs/) details every event type, but the page is misleading. It is implied that the event logs page is only accessible from the organization management menu. When in fact, for every Bitwarden installation, even those with no organization premium plan, the server records events. It is simply not available on the web app.
Instead, events are searchable from the dbo.Event table. This table contains a myriad of information relative to user activity. Data in this table is not encrypted.
The most relevant columns here are:
| Column | Comments |
|---|---|
| ID | ID of the recorded event |
| Type | Event type |
| UserId | User that triggered the event |
| DeviceType | Device type used when triggering the event |
| IpAddress | IP address of the device used when triggering the event |
| Date | Timestamp |
There are sub-columns relative to folder or groups in case the event is about these entities. This table is fascinating and a must-go during a Bitwarden investigation since it gives plenty of details about recent user activity. Furthermore, Bitwarden never clears this table, the retention period is infinite.
The complete list of event types is available here https://bitwarden.com/help/event-logs/.
Logs
When a client reaches the server, either to log in, add a new element to the vault, or register a new device, an API call is made. On a standard Docker Bitwarden installation, traces of these API calls are logged by the nginx reverse proxy. Unfortunately, most of the important API calls are POST requests, where the body is not logged. Enabling nginx POST request body logging requires modifying the default.conf file located in ./bwdata/nginx/ directory. Beware that this file is automatically generated from a template file https://github.com/bitwarden/server/blob/main/util/Setup/Templates/NginxConfig.hbs. Any manual modification applied to this file will be overwritten on updates.
There is a way to disable this automatic configuration rendering behavior, at the expense of having to maintain the file yourself. Edit the file ./bwdata/config.yml, modify the following option:
[...]
# Auto-generate the `./nginx/default.conf` file.
# WARNING: Disabling generated config files can break future updates. You will be
# responsible for maintaining this config file.
# Template: https://github.com/bitwarden/server/blob/master/util/Setup/Templates/NginxConfig.hbs
generate_nginx_config: false
#
[...]
Once this modification is applied, edit file ./bwdata/nginx/default.conf. Add this line at the beginning of the file:
log_format postdata escape=json '$remote_addr - $remote_user [$time_local]' '"$request" $status $bytes_sent' '"$http_referer" "$http_user_agent" "$request_body"';
This creates a new log format for POST data. Now find the line location / {. Add access_log /var/log/nginx/access.log postdata; right before the location block. Your default.conf file should contain:
  include /etc/nginx/security-headers-ssl.conf;
  include /etc/nginx/security-headers.conf;

  access_log /var/log/nginx/access.log  postdata;

  location / {
    proxy_pass http://web:5000/;
    include /etc/nginx/security-headers-ssl.conf;
    include /etc/nginx/security-headers.conf;
    add_header Content-Security-Policy "default-src 'self'; script-src 'self' 'wasm-unsafe-eval'; style-src 'self' 'unsafe-inline'; img-src 'self' data: https://haveibeenpwned.com; child-src>
    add_header X-Frame-Options SAMEORIGIN;
    add_header X-Robots-Tag "noindex, nofollow";
  }
This produces the following logs. These logs come from the creation of a new cipher and a new folder, as well as a new login:
10.0.101.1 -  [04/Sep/2024:09:28:17 +0000]"POST /api/ciphers HTTP/2.0" 200 890"https://10.0.101.56/" "Mozilla/5.0 (X11; Linux x86_64; rv:109.0) Gecko/20100101 Firefox/115.0" "{\"type\":1,\"organizationId\":null,\"name\":\"2.MU2fhtv+m7421TOR/nRHNg==|15wyabIFTp87P6b4aefN1A==|pwGtwXKaSBss2mxdI16oBLPDbn9gwfz+0SKaAzd9GOQ=\",\"notes\":null,\"favorite\":false,\"lastKnownRevisionDate\":null,\"reprompt\":0,\"key\":\"2.5mX850b/VWcVQhyiWFEIYQ==|857GFbo7LEOLTetWun4Ot66mqzGTXrMal/ziJrScfeGU+jyasLpiZnUGEE87OlrIf/yhznW3G+wOsxXCNoZcVVEQqB8uYecVl5og8mysH1U=|I5Xhwj0OZQSzqvZe/sQMzMmM4N/HvEjFqdJuFy7jHPc=\",\"login\":{\"response\":null,\"uris\":[],\"username\":null,\"password\":null,\"passwordRevisionDate\":null,\"totp\":null,\"autofillOnPageLoad\":null}}"
10.0.101.1 -  [04/Sep/2024:09:28:23 +0000]"POST /api/folders HTTP/2.0" 200 509"https://10.0.101.56/" "Mozilla/5.0 (X11; Linux x86_64; rv:109.0) Gecko/20100101 Firefox/115.0" "{\"name\":\"2.tpy+fJWqP1R9jVjjsO8X7w==|dxT3EahBxLHcuTj2ssm4eQ==|zH2yjvVXT5BakAqwD6hLs+FYCLSjOXLK4CNjrEsUQEs=\"}"
10.0.101.1 -  [04/Sep/2024:09:28:39 +0000]"POST /identity/accounts/prelogin HTTP/2.0" 200 395"https://10.0.101.56/" "Mozilla/5.0 (X11; Linux x86_64; rv:109.0) Gecko/20100101 Firefox/115.0" "{\"email\":\"<email>\"}"
10.0.101.1 -  [04/Sep/2024:09:28:40 +0000]"POST /identity/connect/token HTTP/2.0" 200 3243"https://10.0.101.56/" "Mozilla/5.0 (X11; Linux x86_64; rv:109.0) Gecko/20100101 Firefox/115.0" "scope=api%20offline_access&client_id=web&deviceType=10&deviceIdentifier=1855b82e-cbd2-44d7-8c54-05615d1b6c9a&deviceName=firefox&grant_type=password&username=user%40user.com&password=WVpWXsw4bYtSPXhgO8py4y86LnmYy8XGe%2BMAmc27NHk%3D"
10.0.101.1 -  [04/Sep/2024:09:28:40 +0000]"POST /identity/connect/token HTTP/2.0" 200 1608"https://10.0.101.56/" "Mozilla/5.0 (X11; Linux x86_64; rv:109.0) Gecko/20100101 Firefox/115.0" "grant_type=refresh_token&client_id=web&refresh_token=3D5EAFB874B7C768C79361D6C9DD524248604AD503855CE0CA4F6CE66DD65045-1"
As we explained before, Bitwarden is a shell that stores encrypted data. Since data is encrypted client-side before being sent to the server, POST data contains mostly encrypted data, which might not be relevant during the investigation.
Beware that enabling this feature will display connection tokens or refresh tokens in the logs. Since this article started with the assumption that the attacker possesses high privilege access to the server, logging POST data may bring more harm than good. It is possible to log POST data only for specific locations by moving the access_log instruction inside nginx location blocks.
Conclusion
Bitwarden is a robust password manager with self-hosting capabilities. An attacker gaining high privileges on the Bitwarden server does not immediately gain access to all the corporate secrets.
On the other hand, an uninvited guest exfiltrating the backup database exposes the company to data leaks. Precisely, all the employees' names and email addresses, company business emails addresses, premium license keys, API keys, IP addresses and 2FA tokens.
In this situation, it is recommended to rotate API keys and 2FA tokens, force users to change their master passwords and perform an encryption keys rotation following this post from Bitwarden documentation https://bitwarden.com/help/account-encryption-key/.
Additionally, Bitwarden implements a versatile and reliable event system to aid in investigations and breaches. Diving into all the events type and understanding their meanings will be key for a successful Bitwarden forensic investigation.