Using Veeam metadata for efficient extraction of Backup artefacts (2/3)
In a previous blogpost, we explored Veeam Backup & Replication's "backup chain metadata" files and how to parse them in a comprehensive Velociraptor artifact. In this article, we complement our findings with metadata embedded directly in VBR's Storage files. Then, we create a Velociraptor pipeline to remotely access relevant forensic artefacts in backed up data. This aims to enable DFIR analysts to extend the time horizon in their investigations using Veeam backups and Velociraptor, while minimizing network bandwidth usage and extensive recovery operations.
Vous souhaitez améliorer vos compétences ? Découvrez nos sessions de formation ! En savoir plus
Introduction
In our previous blogpost1 in this series, we introduced key concepts of Veeam Backup & Replication (VBR) software. This helped us understand some aspects of the XML metadata found in VBR's .vbm files, the Veeam backup chain metadata files. Armed with this knowledge, we were able to craft a Velociraptor artifact that parsed those backup chain metadata files and provided a filterable list of unencrypted Restore Points.
In this follow-up article, we fill the gap in our understanding of VBR's metadata and then focus on a more practical use-case. Using Veeam metadata and the Velociraptor forensic tool, we build a pipeline automating the remote collection of forensic data from Veeam backups.
AuxData for vSphere Hosts
The last article in this series set aside metadata of vSphere VMs. To complete our knowledge of Veeam backups metadata, we explore the specificities of the AuxData structure for backups of vSphere VMs.
Here is an excerpt of the AuxData for the backup of a Windows 10 VM hosted on a vSphere hypervisor:
<COibAuxData>
    <CreationUsn value="2" />
    <HasVssMetadata>False</HasVssMetadata>
    <CreationTimeUtc>02/29/2024 19:07:39</CreationTimeUtc>
    <COibAuxDataVmware>
        <VmMoRef>3</VmMoRef>
        <HostName>192.168.122.32</HostName>
        <EsxName>192.168.122.32</EsxName>
        <DataStoreRef>65df6ad8-a805e849-ee6e-525400c567ff</DataStoreRef>
        <ResourcePoolRef>ha-root-pool</ResourcePoolRef>
        <FolderRef>ha-folder-vm</FolderRef>
        <SnapshotRef>3-snapshot-2</SnapshotRef>
        <SnapshotCreationTime>5250134322990340604</SnapshotCreationTime>
        <DirPath>[datastore1] vsphere-windows10-vm</DirPath>
        <Location>192.168.122.32</Location>
        <OijId>64157f0d-bcea-40ae-946b-ba2c291de7b9</OijId>
        <RealVmSize>85899893560</RealVmSize>
        <VmxFileDatastorePath>vsphere-windows10-vm/vsphere-windows10-vm.vmx</VmxFileDatastorePath>
        <Profiles />
        <Tags />
        <NicInfo Nic="0" ConnectAtPowerOn="True" PciSlotNumber="192">
            <Network>
                <Name>VM Network</Name>
            </Network>
        </NicInfo>
        <Disk>
            <Key>2000</Key>
            <UnitNumber>0</UnitNumber>
            <ControllerKey>1000</ControllerKey>
            <Controller></Controller>        <!-- Information on the virtual device controller -->
            <DescFileName>vsphere-windows10-vm.vmdk</DescFileName>
            <FlatFileName>vsphere-windows10-vm-flat.vmdk</FlatFileName>
            <ChangeId>52 bc 8d 02 dd dc db d9-ca b6 b1 37 d6 78 03 1e/1</ChangeId>
            <SnapshotRef />
            <DatastoreRef>65df6ad8-a805e849-ee6e-525400c567ff</DatastoreRef>
            <Path>[datastore1] vsphere-windows10-vm/vsphere-windows10-vm.vmdk</Path>
            <BusType>2000</BusType>
            <Label>Hard disk 1</Label>
            <Uuid>6000C29d-12ad-6758-357b-bba807f4927d</Uuid>
            <Capacity>85899345920</Capacity>
            <ThinProvisioned>False</ThinProvisioned>
            <EagerlyScrub>False</EagerlyScrub>
            <ExistsInBackup>True</ExistsInBackup>
            <ContentId>c4828daaf6e39f2615245506679f20c1</ContentId>
            <UseBlockExclude>True</UseBlockExclude>
            <Mode />
            <TaskId />
            <DiskId>
                8d8d2cce-9410-411f-a8ef-0977e98977dc:a31adaa3-4ecc-47a6-ab11-7d3bbf9aba6e:2000:34ccc096-3f0a-429a-9674-524944d2e458
            </DiskId>
            <State>Processed</State>
            <Type>Default</Type>
            <ValidProcessedOffset>85899345920</ValidProcessedOffset>
            <RansomwareIndexFileName />
        </Disk>
        <VmStateInStorageSnapshot>0</VmStateInStorageSnapshot>
        <VmxDatastoreUuid>65df6ad8-a805e849-ee6e-525400c567ff</VmxDatastoreUuid>
        <VmxDiskPaths />
        <StorageSnapshotJobName></StorageSnapshotJobName>
        <NumCpus>2</NumCpus>
        <MemSizeMb>4096</MemSizeMb>
        <CoresPerSocket>1</CoresPerSocket>
        <Firmware>1</Firmware>
    </COibAuxDataVmware>
</COibAuxData>
Inside the COibAuxDataVmware element can be found the number of virtual CPUs (NumCpus), number of virtual cores per socket (CoresPerSocket) and RAM size in MiB (MemSizeMb) of the backed up VM.
For each disk attached to the VM, we can find its unique identifier (Uuid), its label / friendly name (Label), its overall capacity in bytes (Capacity) and the name of the flat .vmdk file that contains the actual disk data, all of which are under a Disk sub-element. Just as with other Host platforms, if the State element is Processed, the ValidProcessedOffset element will also contain the disk's capacity.
With that new knowledge, we can now update the Velociraptor artifacts created for the last article. Each new exploration extends the precision of the RestorePoints Velociraptor artifacts.
Exploring metadata embedded in Storage files
Veeam offers a free extraction tool that can be used to recover disk images from VBR's backup files2. This tool only needs the Storage files between the desired Restore Point and the last full backup in the chain to properly work. It does not require any backup chain metadata file. This means that metadata about the backup is at least partially embedded in each Storage file.
Lucky for us, in unencrypted backups, this data is not obfuscated and is available as a plain string. grepping for <OibSummary>, the root element of the XML metadata, is sufficient to find the information we seek. The hierarchy of the extracted XML metadata is as follows:
<OibSummary>
    <Backup/>            <!-- Information on Backup Job/Policy -->
    <Point/>             <!-- Restore Point -->
    <Storage>            <!-- Storage file -->
        <!-- Backup stats -->
    </Storage>
    <OIB></OIB>          <!-- Information about the Object In Backup structure -->
    <Object></Object>    <!-- Backed up Object -->
    <TargetHost/>        <!-- Host which receives the backed up Object -->
    <PrevFileName>       <!-- Previous file in the backup chain -->
        C:\Backup\Backup Job vSphere\vsphere-windows10-vm.3D2024-02-29T190652_AB4B.vbk
    </PrevFileName>
    <BackupVersion>2</BackupVersion>
    <OibFiles>           <!-- List of extractable files -->
        <File>
            <PlatformDetails/>
        </File>
        <File>
            <PlatformDetails/>
        </File>
        <File>
            <PlatformDetails/>
        </File>
    </OibFiles>
    <LogBackupInfo></LogBackupInfo>
    <SourceHost/>        <!-- Host which manages the backed up Object -->
</OibSummary>
Some of this information is almost identical to what is found in Veeam backup chain metadata files. For example, the Storage element contains identical information, apart from the backup stats which are in the content of the XML element instead of in one of its attributes. One of the additional elements is PrevFileName which contains the absolute path to the last Storage file in the backup chain.
There are multiple instances of this metadata inside each Storage file. They seem to be created as the content of the OIB is updated, meaning the most accurate and updated metadata is in the last iteration.
List of files in OIB
The OibFiles element contains a list of File elements. Each File element provides details for a file that can be extracted from the Storage file.
<File FileName="vsphere-windows10-vm-flat.vmdk" Size="85899345920"
    LastModification="01/01/0001 00:00:00" Exist="True" IsPassThroughDisk="False"
    IsDiskProcessing="False">
    <PlatformDetails [...] />
</File>
Compared to metadata in .vbm files, the OibFiles element has two advantages:
Fileelements always have the same structure. Only thePlatformDetailssub-element is platform-specific. This means it is a more reliable way to get the name of the file (FileNameattribute) and its size in bytes (Sizeattribute) without having to rely on a platform-specificAuxDatastructure.- The
OibFileselement contains a complete list of extractable files inside the Storage file (even files with a size of 0 bytes). This means the list of extractable files derived from this element is more accurate than the one derived fromAuxDatain.vbm.
Source and Target Hosts
<SourceHost Id="eb2d3afe-69e3-4ee3-bf1e-952bee99aa15" Name="192.168.122.32"
    Description="Created by VEEAM-SRV\Administrator at 28/02/2024 17:43." Ip="0.0.0.0" Type="6"
    Reference="ha-host" Info="VMware ESXi 7.0.3 build-21930508"
    ParentId="00000000-0000-0000-0000-000000000000" Protocol="0" ApiVersion="40" Options=""
    PhysHostId="1fa8d182-26d6-4b19-a497-1ae1d37a23d1"
    CredsId="00000000-0000-0000-0000-000000000000" DnsName="" HostInstanceId="veeam-hvlab.local"
    HostInstanceIdV2="dae66f73-ed79-4d5b-b206-a51991a74ab1" HostUniqueId="veeam-hvlab.local" />
The SourceHost structure contains additional information compared to the Host structure in .vbm files. Details about the host at the time of backup are stored in Description and Info attributes. When applicable, for example if the backup is done using vSphere API, the API version is specified in the ApiVersion attribute.
Most of the information contained in this structure mirrors information in VBR's internal database. The current state of this information can be queried via Veeam Backup Powershell module, for example with the Get-VBRServer3 cmdlet:
PS C:\Users\Administrator> Get-VBRServer -Name "192.168.122.35"


Info               : 192.168.122.35 (Microsoft Hyper-V server)
ParentId           : 00000000-0000-0000-0000-000000000000
Id                 : 3d0dc48d-042d-4ab0-994b-ee0146518814
Uid                : 3d0dc48d042d4ab0994bee0146518814
Name               : 192.168.122.35
Reference          :
Description        : Created by VEEAM-SRV\Administrator at 03/01/2024 16:39.
IsUnavailable      : True
Type               : HvServer
ApiVersion         : Unknown
PhysHostId         : 38eb8a57-9e46-4f64-b20f-dd5f09ad2760
ProxyServicesCreds : Veeam.Backup.Common.CCredentials
As can be seen, the output of this cmdlet corresponds to the following metadata embedded inside a backup of a VM hosted on the Hyper-V hypervisor:
<SourceHost Id="3d0dc48d-042d-4ab0-994b-ee0146518814" Name="192.168.122.35"
    Description="Created by VEEAM-SRV\Administrator at 03/01/2024 16:39." Ip="" Type="7"
    Reference="" Info="Microsoft Windows Server 2022 Standard 64-bit (10.0.20348 build:20348)"
    ParentId="00000000-0000-0000-0000-000000000000" Protocol="0" ApiVersion="0" Options=""
    PhysHostId="38eb8a57-9e46-4f64-b20f-dd5f09ad2760"
    CredsId="be3aa152-a92a-4159-bed7-255a5196ce6a" DnsName="veeam-hvlab2.local"
    HostInstanceId="veeam-hvlab2.local" HostInstanceIdV2="46412451-8f9a-45ee-8afd-8987c57ede61"
    HostUniqueId="" />
If the Backup Job required stored credentials, their identifier is specified in the CredsId attribute. The type of host is a number in the Type attribute. Our testing showed the following match:
| Number | Type |
|---|---|
| 3 | Local |
| 6 | ESXi |
| 7 | HvServer |
Embedded metadata also contains TargetHost attribute, which in our test data was always the server hosting VBR software and receiving the backup:
<TargetHost Id="6745a759-2205-4cd2-b172-8ec8f7e60ef8" Name="This server"
    Description="Backup server" Ip="" Type="3" Reference="" Info=""
    ParentId="00000000-0000-0000-0000-000000000000" Protocol="0" ApiVersion="0" Options=""
    PhysHostId="d7c4ff97-b99b-4d1f-884d-283b7b6b9ee3"
    CredsId="00000000-0000-0000-0000-000000000000" DnsName="" HostInstanceId=""
    HostInstanceIdV2="" HostUniqueId="" />
Velociraptor Artifact
Using this newfound knowledge, we submitted Windows.Veeam.RestorePoints.BackupFiles to the Artifact Exchange. It takes a list of paths to Backup Repositories as input, then proceeds to extract the embedded metadata from each Storage file found within. To accomplish this, it finds the offset of the last occurrence of <OibSummary> with the following YARA rule:
rule StartOffsetRule {
    strings:
        $start = "<OibSummary>"
    condition: any of them
}
It then finds the closest offset afterwards where the string </OibSummary> occurs. It finally reads data between these two offsets and parses it as XML.
The case of the lost log
DFIR analysts sometimes need to extend their time horizon, especially when investigating long-lived threats. The most recent data may not give the best forensic results, whether because of successful anti-forensic actions or simply because of log rotation.
In a remote investigation where a Velociraptor agent is installed on the Veeam Backup & Replication server, our goal is to collect parsed Windows Event Logs from a backed up VM. The actions taken to do so require a lot of processing power and I/O events. As such, it is recommended to perform these investigations on a Veeam Backup & Replication server that is not compromised, to avoid overwriting potential forensic data (logs on the VBR server, files in unallocated space, etc.).
In the following scenario, we aim to find specific log events (RDP connections, for example) that were incidentally backed up as part of a regular backup policy.
Preparing the tools
For this use-case, we are going to need two tools:
- Veeam Backup & Replication Extract Utility: this tool will extract all the files compressed in the given Storage file. At the time of writing, downloading this file requires an account on Veeam's website, necessitating a professional e-mail address.
- The
qemu-imgtool from QEMU: this will help in converting disk images to a raw format when needed.
VBR's Extract Utility is a standalone executable that can be used as-is on the Storage file. The Windows build of qemu-img, however, needs a set of DLLs to function. To package it into a single file that can be distributed to a Velociraptor client, the qemu-img.exe file was compressed inside an archive (qemu-img.zip) alongside the following DLLs:
libbrotlicommon.dlllibbrotlidec.dlllibbz2-1.dlllibcrypto-3-x64.dlllibcurl-4.dlllibffi-8.dlllibgcc_s_seh-1.dlllibglib-2.0-0.dlllibgmp-10.dlllibgnutls-30.dlllibhogweed-6.dlllibiconv-2.dlllibidn2-0.dlllibintl-8.dlllibnettle-8.dlllibnfs-14.dlllibp11-kit-0.dlllibpcre2-8-0.dlllibpsl-5.dlllibssh.dlllibssh2-1.dlllibssp-0.dlllibtasn1-6.dlllibunistring-5.dlllibwinpthread-1.dlllibzstd.dllzlib1.dll
Launching the tools
VBR's Extract Utility must be launched on the Velociraptor client with the following command line:
.\Extract.exe -restore -vm <VM_NAME> -host <HOST_NAME> <STORAGE_FILE> <OUTPUT_FOLDER>
where VM_NAME is the VmName attribute of the OIB element in the metadata and HOST_NAME, the Name attribute of either Host or SourceHost element (depending on the source of the metadata). STORAGE_FILE must be replaced with the absolute or relative path to the Veeam full backup file (.vbk), Veeam incremental backup file (.vib) or Veeam reverse incremental backup file (.vrb) from wich we want to extract disk data. OUTPUT_FOLDER must be replaced with an absolute or relative path to a folder where files will be extracted.
Extracted files will be placed in a new directory which name is ExtractName(ExtractID), where ExtractName and ExtractID are respectively the Name and Id attributes of the Object element in the metadata.
If the extracted disk files we want to target are in VHDX or VMDK format, we need to convert them to a raw disk image format using:
.\qemu-img.exe convert <SOURCE_FILE> -O raw <DESTINATION_FILE>
Please note this has a significant drawback: each extraction can require up to 2 times the size of the extracted disk of free space. This means that to work on a backup of a VM with a 200 GB disk, we would need 400 GB of free space: 200 for the extracted VMDK (or VHDX) and 200 for the converted raw disk image. This implies that:
- This methodology should never be conducted in a case where forensic data must be preserved on the Veeam Backup & Replication server.
- The tradeoff to avoid network bandwidth bottleneck in such a remote forensics investigation is the ability to add extra disk space for on-premises data processing. It is a safe bet to assume that a backup server natively has sufficient storage capacity.
To make sure you have sufficient disk space for the process, you can first get information about available free space with the Generic.Client.DiskSpace artifact. Then, you can compare with the total size of extractable files for each Storage file, using the following VQL query on the results of a RestorePoints artifact:
LET restore_points = SELECT * FROM source(artifact='Exchange.Windows.Veeam.RestorePoints.MetadataFiles')

SELECT BackupFilePath, humanize(bytes=sum(item=int(int=_value))) AS TotalExtractableSize
FROM foreach(row=restore_points,
  query={
      SELECT BackupFilePath, * FROM items(item=ExtractableFilesSize)
  })
GROUP BY BackupFilePath

Doubling the value of TotalExtractableSize for each Storage file will give the theoretical maximum size of extracted data on disk.
Collecting forensic data
The last step in our workflow is the actual processing of the raw disk image.
One option to do this is to deploy DFIR ORC4 (customizable collection tool developped by ANSSI, the French National Agency for the Security of Information Systems) on the endpoint, and collect its output. You want to launch DFIR ORC with the offline option pointing to the raw disk image to analyze. For example:
.\DFIR-Orc.exe /offline=E:\extracted\disk_image.raw
Another option is using Velociraptor, which contains many built-in artifacts as well as a functionality to import community artifacts. Some of these artifacts do not rely on a live system but work with static data, meaning it is possible to collect forensic data directly from disk images5.
To do this, we apply accessors remapping6, based on the following flat disk image remapping configuration: https://gist.github.com/scudette/ffcd3ed2e589ebbdbe5c3edcf3914176. This allows us to launch many useful Velociraptor artifacts on the backed up data, such as:
Generic.Forensic.SQLiteHunter: All-in-one parser for SQLite files (browser data, OS components, etc.).Windows.Forensics.Bam: Extraction of Background Activity Moderator (BAM) data.Windows.Forensics.Shellbags: Analysis of Shellbag registry keys.Windows.Forensics.SRUM: Processing of SRUM (System Resource Usage Monitor) database.Windows.Forensics.SAM: Account information in SAM hive.Windows.Registry.AppCompatCache: Parsing of AppCompatCache (ShimCache) data from the registry.Windows.Registry.UserAssist: Parsing of UserAssist keys from the registry.Windows.Registry.RecentDocs: Extraction of RecentDocs MRU.Windows.Registry.MountPoints2: List remotely mapped drives from the MountPoints2 registry key.Windows.Detection.Amcache: Analysis of entries in the AmCache hive.Windows.Timeline.Prefetch: Execution timeline based on analysis of Prefetch files.Windows.Timeline.Registry.RunMRU: Execution timeline based on analysis of RunMRU registry key.Windows.Timeline.MFT: Timeline of file creation/modification/deletion from the Master File Table (MFT).Windows.Applications.OfficeMacros: Analysis of Office macros.Windows.Sys.StartupItems: List of applications that will be started up from the various run key locations.Windows.Sys.Users: List of user accounts by inspecting registry keys.Windows.EventLogs.RDPAuth: Extraction of Event Logs related to Remote Desktop sessions, logon and logoff.- and more!
After processing is done, we can filter the results on any field that we want: name of the backed up VM, time the data was backed up, artifact name, etc.
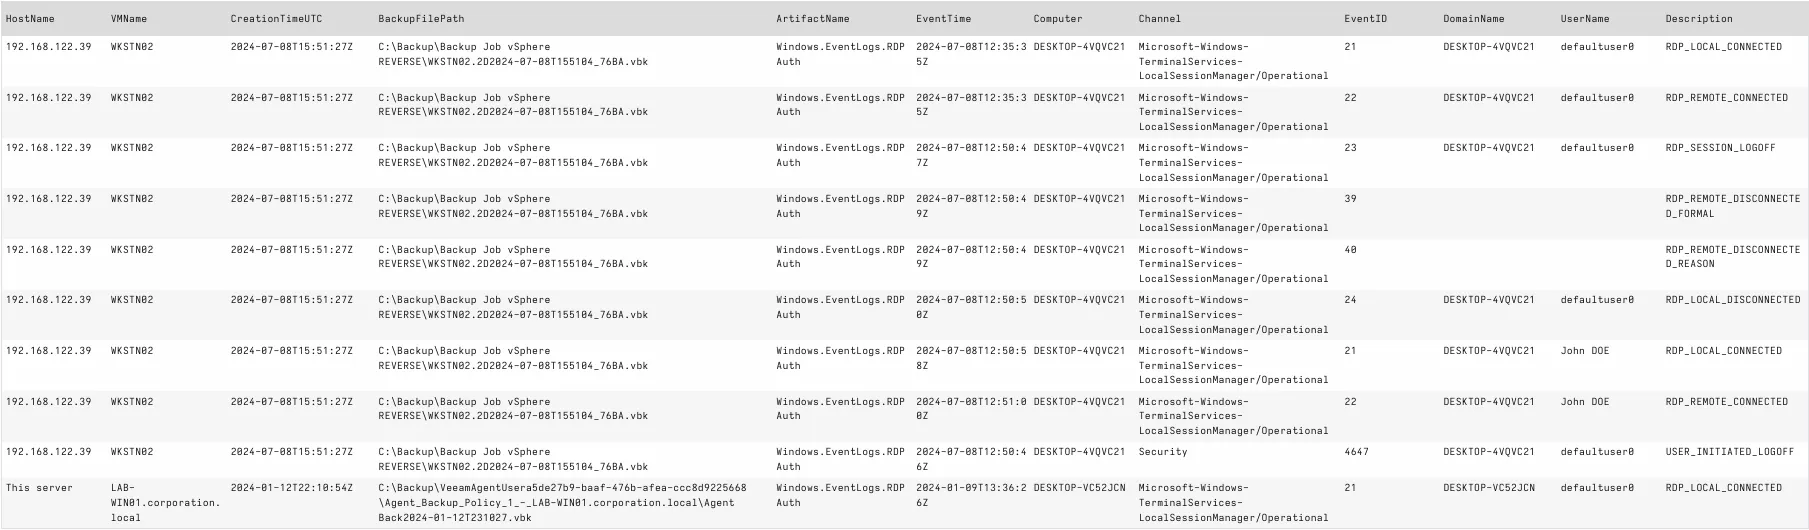
In our "lost log" case, we can easily find RDP authentication logs via Windows.EventLogs.RDPAuth, then filter that data:
SELECT * FROM source(artifact='Exchange.Windows.Veeam.ProcessBackups')
WHERE ArtifactName = 'Windows.EventLogs.RDPAuth'
Automating with Velociraptor
We created a proof-of-concept for a Veeam backups remote forensics pipeline using Velociraptor. This pipeline takes the form of a small collection of Velociraptor Artifacts that can be ingested on a Velociraptor server.
This artifact pack automates the following steps:
- Parsing all metadata found within a Backup Repository (either via the Veeam backup chain metadata files or via metadata embedded in Storage files).
- Filtering on this metadata to focus on certain backups.
- Extracting files from selected Storage files.
- Converting extracted files to raw disk image format if necessary.
- Applying accessors remapping.
- Lauching a list of Velociraptor artifacts, defined at the end of the
Exchange.Windows.Veeam.ProcessDiskImageartifact.
VQL challenges
Due to the unique design of Velociraptor and its querying language (VQL), we faced many challenges crafting this pipeline. Velociraptor is still in beta and finding the right source of information for your need may be difficult. If you are ever stuck while writing a VQL, don't hesitate to:
- Look for updates inside the documentation and read on fundamental concepts of the tool.
- Read and take inspiration from other artifacts, either built-in or in the Artifact Exchange.
- Verify functionality by looking at the tool's source code on GitHub.
- Ask a question on the official Discord server.
- Take a break ;)
How to use
In order to launch our pipeline, you must first use one of the RestorePoints artifacts that lists available Restore Points inside a selection of Backup Repositories. Then, you need to filter the output to select only the Restore Points that you want to process. For example, let's say you want to extract data from backups of Windows VM, that are in subnet 192.168.122.128/25, where the backup creation time was before January 4th 2024. You would make the following query:
SELECT * FROM source(artifact='Exchange.Windows.Veeam.RestorePoints.MetadataFiles')
  WHERE GuestOSType =~ 'windows'
  AND GuestIP =~ '192\.168\.122\.(129|1[3-9][0-9]|2[0-4][0-9]|25[0-4])'
  AND CreationTimeUTC < '2024-01-04'
Then, you would need to choose which artifacts to launch on each extracted disk image. This can be customized by modifying the end of Exchange.Windows.Veeam.ProcessDiskImage. For example, you can make a thorough sweep by collecting an MFT timeline and analyzing Windows Event Logs with Sigma:
// Remap so that artifacts are launched on the deaddisk image
LET _ <= remap(config=configuration, clear=TRUE)

// ========================================================
// === ↓ CHANGE THIS SECTION ACCORDING TO YOUR NEEDS ↓ ===
// ========================================================

SELECT * FROM chain(
  a={
      SELECT HostName, VMName, CreationTimeUTC, BackupFilePath, 'Windows.Hayabusa.Rules' AS ArtifactName, *
        FROM Artifact.Windows.Hayabusa.Rules()
  },
  b={
      SELECT HostName, VMName, CreationTimeUTC, BackupFilePath, 'Windows.Timeline.MFT' AS ArtifactName, *
        FROM Artifact.Windows.Timeline.MFT()
  }
)
Now, you just need to launch Exchange.Windows.Veeam.ProcessBackups, with correct parameters:
UseMetadataFiles: Choose if you want to parse XML metadata from Veeam backup chain metadata files or directly from backup files (the latter being way slower).BackupRepositories: List of paths to Backup Repositories containing Storage files.Filter: The filter to apply on the output ofRestorePointsartifact, without theWHEREclause. In our example, this would be:
GuestOSType =~ 'windows' AND GuestIP =~ '192\.168\.122\.(12[89]|1[3-9][0-9]|2[0-4][0-9]|25[0-5])' AND CreationTimeUTC < '2024-01-04'
TemporaryFolderPath: Absolute path to a folder that will contain extracted files. These files may be hundreds of gigabytes (if not terabytes) big. It is advised to use a dedicated external storage for this.
Conclusion
Using our previous and current knowledge about Veeam backups' metadata, free and open-source tools, we managed to create a pipeline to remotely collect relevant forensic data in Veeam backups. We were able to accomplish a small network footprint, with the trade-off of a larger disk I/O footprint. Moreover, our pipeline allows for a precise selection of backups to extract, allowing forensic analysts to target specific points in time. This aims at providing remote forensic analysts with an easy way to extend time horizon for the artefact of their choice.
In the next and last article in this series, we will refine our artifacts to address more endpoint types and continue to dive into Veeam backups forensics.
- 1. https://www.synacktiv.com/publications/using-veeam-metadata-for-efficie…
- 2. https://helpcenter.veeam.com/docs/backup/vsphere/extract_utility.html?v…
- 3. https://helpcenter.veeam.com/docs/backup/powershell/get-vbrserver.html?…
- 4. https://dfir-orc.github.io/
- 5. https://docs.velociraptor.app/blog/2022/2022-03-22-deaddisk/
- 6. https://docs.velociraptor.app/docs/forensic/filesystem/remapping/